What Size Nails for Crown Molding: Precision Matters
You’ll want to use 15- or 16-gauge finish nails around 2 inches long for most crown molding projects.
These nails provide strong holding power and penetrate the 1/2-inch drywall, molding, and at least 1 inch into studs. This prevents looseness or damage.
For lightweight or delicate molding, 18-gauge brads about 1 inch long help avoid splitting. They are often paired with adhesive for extra grip.
Learn how to select nails and techniques tailored to your molding’s size and material for the best results.
Key Takeaways
- Use 2-inch, 15- or 16-gauge finish nails for standard crown molding to ensure proper penetration through drywall and into studs.
- For thicker molding or plaster ceilings, 2-1/2-inch nails provide better holding strength and stability.
- Use 1-inch, 18-gauge brad nails for delicate or lightweight molding to avoid splitting corners.
- Avoid nails shorter than 1-1/4 inches for adequate holding power; nails should penetrate studs by at least 1 inch.
- For very thin or delicate molding, 21- to 23-gauge pin nails combined with adhesive offer subtle hold without damage.
Recommended Nail Sizes for Crown Molding Installation

When installing crown molding, choosing the right nail size is vital for guaranteeing a secure hold and a clean finish.
Typically, 2-inch finishing nails work best for most crown molding applications, penetrating studs, drywall, and the molding adequately.
Typically, 2-inch finishing nails provide the perfect balance for securely fastening crown molding.
For standard crown molding, 15 or 16 gauge finish nails are recommended to provide strong retention without splitting the wood.
If your molding is thicker or installed on plaster ceilings, consider 2-1/2 inch nails to secure the material properly.
For thinner or lightweight molding, you can opt for shorter nails, but avoid anything under 1-1/4 inches to maintain strength.
Make sure you nail into studs spaced 16 or 24 inches apart for maximum stability.
Using the correct nail length and gauge guarantees durability and eases cleanup during finishing.
For delicate molding, pre-drilling finish nail holes with a 1/32-inch bit about 1/2-inch from the groove edge helps prevent wood splitting.
Why Nail Gauge Matters for Holding Crown Molding?
Choosing the right nail gauge is super important for holding your crown molding in place. A thicker gauge, for instance, offers better durability, which means your molding is less likely to loosen over time.
Plus, using the correct gauge ensures that your installation stays secure. You definitely want to avoid damaging the material, right? So, taking a moment to pick the right gauge can make all the difference in the long run!
For crown molding, a 16-gauge nail is often preferred because it reduces the risk of splitting delicate wood while providing adequate holding power.
Nail Gauge Strength
Understanding nail gauge strength is essential for securing crown molding effectively. Different gauges offer varying levels of holding power tailored to specific molding types and installation needs.
Thicker nails, like 15-gauge finish nails, provide superior grip, ideal for heavier or wider crown molding profiles. Meanwhile, 16-gauge nails balance strength and ease of use, making them common for most crown installations.
For lighter or more delicate molding, 18-gauge brads can suffice but offer less holding force. This requires careful placement and sometimes supplementary adhesive.
Using nails too thin risks insufficient penetration and weak joints, while overly thick nails can split delicate wood. Selecting the correct gauge guarantees your nails penetrate studs and molding adequately, maintaining a secure, lasting hold without damaging the material or complicating finishing work.
Cordless brad nailers with features like tool-free depth adjustment can help ensure precise nail placement and countersinking for optimal molding installation.
Impact On Durability
Nail gauge directly affects how securely crown molding stays in place over time.
Thicker nails, like 15 or 16 gauge, provide greater holding power by penetrating deeper into studs and resisting pull-out forces.
Using thinner nails, such as 18 or 23 gauge, can compromise durability, especially under stress or in high-traffic areas.
Proper gauge selection ensures nails maintain grip without bending or breaking during installation.
Additionally, the right gauge prevents damage to delicate molding while delivering sufficient strength.
If you want crown molding to remain flush and stable, choose a nail gauge that balances penetration depth and material integrity.
Ignoring gauge specifications often leads to loose joints, gaps, and eventual detachment, increasing maintenance and repair costs.
Select 15 or 16 gauge nails for lasting, professional-grade results.
Choosing Between 15, 16, and 18 Gauge Finish Nails for Crown Molding
Selecting the right gauge finish nail notably impacts the strength and appearance of your crown molding installation.
Use 15 gauge nails when you need maximum holding power for heavier or hardwood molding. Their thicker shank offers superior grip but leaves a larger hole requiring more filling.
For heavy or hardwood molding, 15 gauge nails provide strong grip but require larger hole filling.
The 16 gauge nails strike a balance between strength and subtlety, making them the most common choice for crown molding, especially medium-weight profiles.
If your molding is lightweight or delicate, 18 gauge brads provide sufficient holding power while minimizing splitting and visible holes. However, they hold less firmly.
You’ll want to match nail gauge to molding weight and wood density to ensure secure fastening without damaging the trim or wall substrate.
Avoid under-gauging, which compromises durability, or over-gauging, which can weaken the wood.
Confirming nailer/gauge compatibility is important to avoid jams and ensure smooth installation.
Choosing Nail Lengths for Crown Molding Thicknesses
Once you’ve chosen the right gauge for your crown molding, the next step is to pick the proper nail length based on the molding’s thickness and the materials behind it.
You want nails long enough to penetrate the stud by at least 1 inch while passing through the drywall and molding securely.
For typical crown molding thicknesses:
Use 2-inch nails for standard 1/2-inch thick crown molding and drywall over studs.
Opt for 2-1/2-inch nails when installing thicker crown or molding over plaster ceilings.
Choose 1-1/4 to 1-1/2 inch nails for thinner trim or casing.
Avoid nails shorter than 1 inch, as they won’t provide adequate holding power.
Matching nail length to thickness guarantees a strong, lasting installation without risk of splitting or weak attachment.
Always wear appropriate safety gear such as safety glasses and dust masks when working with nails and molding to prevent injury.
Using Brad and Pin Nails for Lightweight Crown Molding
When working with lightweight crown molding, brad and pin nails come in handy to secure the pieces without causing damage or splitting. Use 18-gauge brad nails for most lightweight trims; they offer enough holding power while minimizing surface blemishes.
For very delicate or thin crown molding, 21 or 23-gauge pin nails are ideal. They provide a subtle hold without risking wood splitting. Always pair pin nails with adhesive to make certain of a firm bond since pins alone have less holding strength.
Use a pneumatic brad or pin nailer to drive these nails accurately and flush. Avoid longer nails, as they can split thin molding or protrude. This approach ensures a clean finish and preserves the integrity of your lightweight crown molding during installation.
Additionally, using strong adhesive strips can enhance nail holding power and prevent movement during curing.
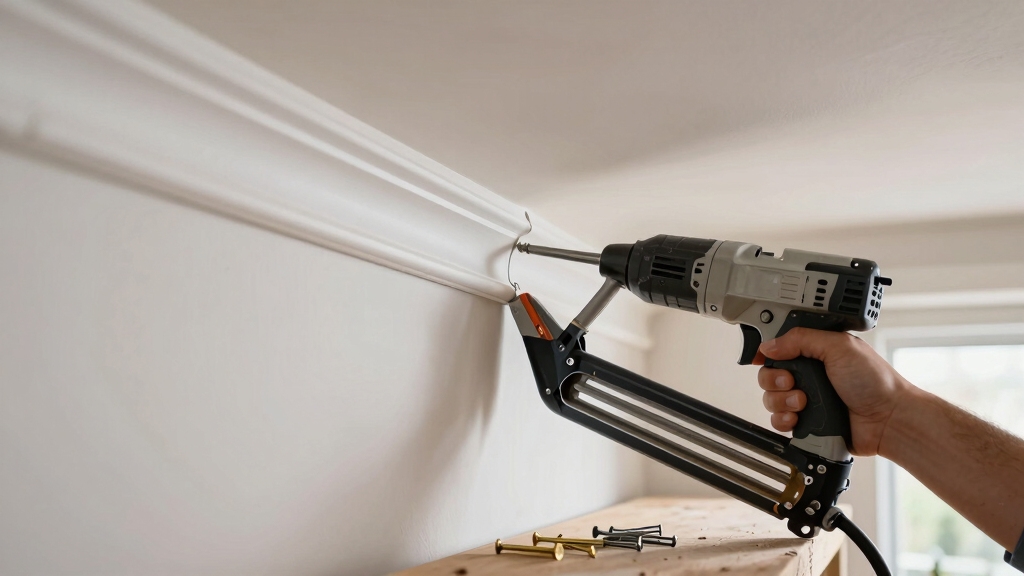
How to Nail Crown Molding Into Studs and Drywall?
Position the crown molding carefully against the wall and ceiling, aligning it so that the nailing points will hit the stud centers behind the drywall. Mark stud locations below the molding to guide accurate nailing.
Use 2-inch, 15 or 16 gauge finish nails to penetrate the 1/2-inch drywall, 1/2-inch molding, and securely embed into the 3-1/2-inch stud. Nail at an angle for better grip and avoid splitting the wood.
When nailing, start by securing the molding at stud centers spaced 16 or 24 inches apart. Use a pneumatic finish nailer for consistent depth and speed. Place nails in the higher profile areas of the molding for easier filling. Avoid nailing solely into drywall to prevent looseness or damage.
This approach guarantees a strong, lasting hold for your crown molding installation. When refinishing floors near moldings, protecting or carefully removing baseboards and quarter round can prevent damage and ensure a clean, professional finish.
Alternatives to Finish Nails for Heavy or Delicate Crown Molding
Although finish nails provide strong hold for most crown molding, certain heavy or delicate installations require alternative fastening methods to guarantee stability without damage.
For heavy crown molding or plaster ceilings, you might use trim head screws, which offer superior structural support without splitting the wood.
Delicate or thin crown molding benefits from 21 to 23 gauge pin nails combined with adhesive, minimizing surface damage while maintaining secure bonding.
You can also employ a wood backer with adhesive and minimal pinning to distribute stress evenly.
Additionally, angling two pins can increase holding power on fragile pieces without risking breakage.
These alternatives make certain your crown molding stays firmly in place while preserving its integrity and appearance, especially when typical finish nails might be too invasive or insufficient.
Using screws with corrosion resistance ensures long-term durability and prevents fastener failure in humid or outdoor-adjacent environments.
Securing Crown Molding Corners With Nails and Glue
Securing crown molding corners requires a combination of nails and glue to guarantee a strong, lasting bond.
You’ll want to apply a quality wood adhesive at the miters before nailing to prevent gaps and movement over time.
Use shorter brad nails, around 1 inch, to avoid splitting the delicate corners while holding the glue in place.
This dual method improves structural integrity and reduces finishing work.
Key points to keep in mind:
- Apply wood glue at all mitered joints before nailing
- Use 18-gauge, 1-inch brad nails for corner fastening
- Angle nails slightly inward for a tighter hold
- Wipe excess glue immediately to avoid staining
This approach makes certain your crown molding corners stay secure and seamless.
Additionally, using low-VOC adhesives can minimize health and environmental impacts during installation.
Tools and Techniques for Crown Molding Installation
Mastering the right tools and techniques is essential for a professional crown molding installation.
Use a pneumatic finish nailer with 15 or 16 gauge nails for strong, consistent fastening.
Mark stud locations every 16 or 24 inches to guarantee secure attachment.
For delicate or lightweight molding, an 18 gauge brad nailer or 23 gauge pin nailer combined with adhesive provides adequate hold.
Always nail into the higher profile areas for easier filling and smoother finishing.
When securing corners, use glue alongside 1-inch brads to reinforce joints.
Angle two nails slightly to increase holding power in challenging spots.
Maintain precise miters and tight joints by cutting with a miter saw and dry-fitting pieces before nailing.
These techniques minimize gaps and guarantee a durable, clean installation.
For optimal results and reduced damage risk, consider using tools with adjustable depth settings to ensure precise nail embedding.
Frequently Asked Questions
Can I Use Nails for Outdoor Crown Molding Installations?
You can use nails for outdoor crown molding, but you need corrosion-resistant types like galvanized or stainless steel nails to prevent rust.
Choose 15 or 16 gauge finish nails, around 2 to 2-1/2 inches long, to guarantee strong holding power through the molding and into structural framing.
Always use a pneumatic nailer for consistent depth and drive nails into studs for maximum stability in outdoor conditions.
How Do Temperature and Humidity Affect Nail Holding Power?
Temperature and humidity directly impact nail holding power by causing wood to expand and contract.
When humidity rises, wood swells, increasing pressure on nails, which can reduce grip if nails loosen.
Conversely, dry conditions shrink wood, potentially loosening nails.
Extreme temperatures can also weaken nail metal or cause brittleness.
To maintain firm holds, you should use appropriate gauge nails and consider acclimating wood before installation to minimize movement and guarantee consistent nail retention.
Are There Nail Size Differences for Painted vs. Stained Crown Molding?
You don’t need different nail sizes for painted versus stained crown molding. You’ll use 15 or 16 gauge finish nails, generally 2 inches long, for both.
The key difference lies in finishing. Painted surfaces require nails that allow for easy filling and sanding. Stained surfaces demand nails that minimize visible holes.
What Safety Gear Is Recommended When Nailing Crown Molding?
You should wear safety glasses to protect your eyes from flying debris and wood splinters when nailing crown molding.
Hearing protection like earplugs or earmuffs is essential if you use a pneumatic nailer frequently.
Gloves can prevent splinters and improve grip, but make sure they don’t reduce finger dexterity.
Also, consider a dust mask if sanding or cutting nearby to avoid inhaling fine particles.
Always keep your workspace well-lit and clear to maintain safety.
How to Remove Nails Without Damaging Crown Molding?
To remove nails without damaging crown molding, use a thin pry bar or a cat’s paw to gently loosen the nail head.
Place a small wood shim or scrap piece between the molding and tool to protect the surface. Work slowly to avoid cracking the molding.
For finishing nails, a pair of needle-nose pliers can grip and pull them out carefully.
Always support the molding firmly to prevent bending or splitting during removal.
Strong, Secure, Stunning: Your Crown Molding Success Guide
Think of choosing nails for crown molding like selecting the right key for a complex lock. You need precision, strength, and the perfect fit. Using the correct gauge and length guarantees your molding stays firmly in place, just as the right key secures the door.
By understanding nail types, placement, and alternatives, you’ll master the craft. This will help you achieve a flawless finish every time. Your attention to detail is the key to lasting, professional results.