What Is T Moulding and When Should You Use It?
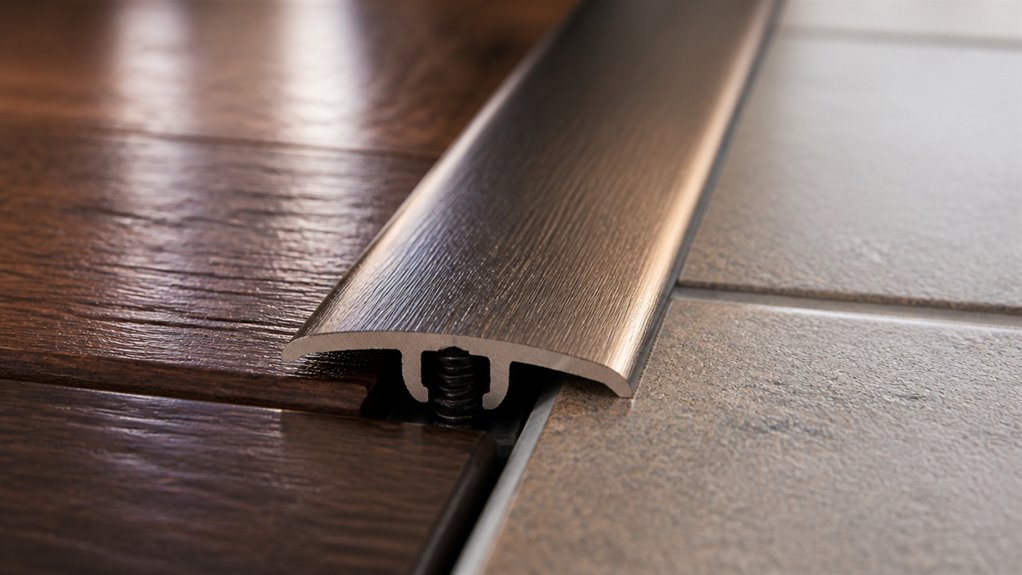
T moulding bridges two flooring surfaces that are nearly the same height. It covers the joint with a flat top while its vertical stem fits into the gap.
You’ll use it when floors differ by no more than 1/8 inch to protect expansion gaps, reduce tripping hazards, and create a polished, stable connection between materials like hardwood, laminate, or tile.
It’s a durable, clean solution. Keep going to find out how to measure and install it properly.
Key Takeaways
- T moulding is a T-shaped flooring transition piece that bridges two floors of equal or nearly equal height.
- It covers expansion gaps to protect floors and allow natural movement without damage.
- Ideal for joining different flooring materials like hardwood to tile or laminate to carpet with minimal height difference.
- Made from materials like wood, MDF, aluminum, or PVC, chosen based on durability and moisture resistance needs.
- Installed by fitting the vertical stem into the gap and securing the flat top flush with both floor surfaces.
Understanding T Moulding: Definition and Function

T moulding is a practical solution you’ll often use to bridge two flooring surfaces that sit at nearly the same height.
T moulding seamlessly connects two flooring surfaces that are close in height for a smooth transition.
It’s shaped like a “T,” with a flat top that covers the joint and a vertical stem that fits securely into the gap between floors.
This moulding works best when the height difference between the two surfaces is no more than ⅛ inch.
You’ll find it useful for joining floors made of different materials, like hardwood and tile, or laminate and carpet.
Besides creating a smooth visual shift, t moulding protects expansion gaps, which allow flooring materials to move naturally.
It also prevents tripping hazards by covering uneven edges, giving your floors a polished, finished look.
For height differences slightly larger than 1/8 inch, using a transition strip can help create a seamless connection between floors.
When to Use T Moulding in Flooring?
You’ll want to reach for T moulding when you have two flooring surfaces that meet at the same height or just a tiny bit apart. It’s a great solution for bridging different materials, like hardwood and tile or laminate and carpet. Plus, it helps avoid any tripping hazards, which is always a plus!
Using T moulding not only creates a clean and polished look, but it also takes care of those slight expansion gaps between the floors. So, if you’re looking to make your space look seamless and professional, T moulding is definitely the way to go! Proper installation of transition strips like T moulding enhances overall design and ensures seamless transitions between different flooring sections.
Equal Height Floors
Flooring transitions between surfaces of equal height call for a solution that guarantees safety and aesthetics without disrupting the flow of your space. T moulding fits perfectly here, bridging floors that match in height or differ by no more than ⅛ inch.
You’ll want to use T moulding when:
- Both floors are level, avoiding tripping hazards.
- You need a clean, finished look between rooms.
- You want to protect expansion gaps in floating floors.
- You’re joining similar or different materials with minimal height difference.
This moulding locks into the gap, covering edges and providing a smooth transition. It keeps your floors stable and visually connected.
This makes it ideal for hardwood to laminate or tile to vinyl transitions where surfaces align evenly. Proper maintenance, including avoiding excess moisture, helps preserve the integrity of hardwood floors under and around T moulding.
Transitioning Different Materials
When joining different flooring materials, such as hardwood to tile or laminate to carpet, you need a junction piece that accommodates their unique properties while maintaining a smooth surface.
T moulding works perfectly here because it bridges floors of similar height, within ⅛ inch, allowing for smooth connections without tripping hazards.
It fits into the gap between materials, covering expansion spaces and protecting edges.
You’ll find T moulding ideal when connecting engineered wood to bamboo or vinyl plank to ceramic laminate, ensuring durability and a clean aesthetic.
Just measure the gap accurately, confirm even floor height, and install the moulding using adhesive or caulk for a secure fit.
This practical piece balances functionality and looks, making it essential for mixed-material flooring linkages.
It is also important to account for floor height differences that may require removal of some tile or the use of transition strips to maintain proper clearance and smooth transitions.
Best Flooring Materials for T Moulding
When you’re picking T moulding, it’s super important to consider the types of flooring you’re joining together.
Whether it’s hardwood, laminate, tile, or vinyl planks, you want to make sure everything matches up nicely.
Also, think about durability!
You need moulding that can handle foot traffic and stand up to wear over time.
A few popular choices are wood, MDF, and aluminum.
Each of these materials has its own strengths, so it really depends on your specific flooring setup.
Additionally, ensuring the compatibility of engineered hardwood with existing flooring is crucial for a seamless and durable transition.
Compatible Flooring Types
Choosing the right materials to pair with T moulding is essential for a clean, durable changeover between rooms. You want flooring types that sit at the same height and complement the moulding’s function.
Here are four common compatible flooring types:
- Laminate to Laminate – Perfect for uniform height and smooth changeovers.
- Hardwood to Engineered Wood – Both have similar thickness, allowing T moulding to fit snugly.
- Vinyl Plank to Tile – Works well when height differences are minimal, maintaining a level surface.
- Bamboo to Laminate – Both rigid surfaces provide stability under the moulding.
Make sure the flooring edges are straight and properly spaced. Avoid pairing materials with noticeable height differences, as T moulding isn’t designed for large gaps or uneven surfaces. When using vinyl planks, select options with a rigid SPC core for enhanced dimensional stability and to maintain an even transition.
Durable Material Options
Explore durable material options that guarantee your T moulding lasts while maintaining a polished look between flooring types.
You’ll find hardwood a popular choice for its natural strength and aesthetic appeal, especially when matched to existing hardwood floors.
Engineered wood offers stability against moisture and temperature changes, making it a practical alternative.
For high-traffic areas, aluminum T moulding stands out with superior durability and resistance to wear. Its industrial look may not suit every style.
PVC or vinyl options provide flexibility and moisture resistance, ideal for areas prone to humidity.
When selecting, consider the flooring material’s hardness, moisture exposure, and foot traffic to safeguard the T moulding’s durability and appearance.
Choosing adhesives with moisture resistance can further enhance the longevity of your T moulding installation.
This protects your flooring junction for years to come.
Measuring and Preparing for T Moulding Installation
Before installing T moulding, start by accurately measuring the gap between the two flooring surfaces you want to join. This guarantees a precise fit and smooth shift.
Next, check that both floors are level, as T moulding works best when height differences stay within ⅛ inch.
Then, prepare the area by cleaning the gap thoroughly to remove dust and debris. This allows adhesives to bond properly.
Finally, cut the T moulding to match the measured length exactly.
Here’s a quick checklist to prepare:
- Measure the gap width and length between floors carefully.
- Confirm both flooring surfaces are level within ⅛ inch.
- Clean the joint area to remove dust and particles.
- Trim the T moulding piece to fit the measured length.
Following these steps sets you up for a successful installation. Using a snapped chalk line can help ensure straight alignment during the installation process.
Installing T Moulding: Step-by-Step
Starting with a clean, measured gap, you’ll first apply silicone caulk or polyurethane adhesive into the expansion space between the floors.
Begin by applying silicone caulk or polyurethane adhesive into a clean, measured expansion gap between floors.
Next, cut the T moulding to the exact length of the gap, ensuring a snug fit.
Insert the vertical stem of the moulding firmly into the gap, pressing it down so the top sits flush with both floor surfaces.
Use painter’s tape to hold the moulding in place while the adhesive cures, preventing any movement.
Wipe away excess adhesive immediately to keep a clean finish.
After the adhesive dries, remove the tape and check that the moulding is secure and level.
For best results, ensure the work area is protected and clean to maintain adjacent surface protection during installation.
This straightforward process guarantees a durable, seamless junction between your flooring surfaces.
Why Choose T Moulding Over Other Transitions?
Frequently, when deciding on flooring junctions, you’ll find that T moulding offers a practical solution that blends functionality with aesthetics.
You should choose T moulding over other connectors because it efficiently bridges floors of equal height, providing a smooth and safe surface.
It’s especially useful when you want a clean, consistent look without bulky edges.
Here’s why you might prefer T moulding:
- It covers expansion gaps neatly, protecting your floors from damage.
- It reduces tripping hazards by smoothing uneven edges.
- It works well with various flooring materials like hardwood, laminate, and tile.
- It allows for natural floor movement without cracking or warping.
Choosing T moulding guarantees durability and a professional finish at your flooring junctions.
Additionally, proper installation with adequate expansion gaps beneath T moulding is essential to accommodate seasonal wood movement and prevent separation or buckling.
Key Dimensions and Specs for T Moulding
Understanding the key dimensions and specifications of T moulding is essential to guarantee a proper fit and function between your flooring surfaces.
You need to ensure the two floors are at the same height or within a ⅛ inch difference. The vertical stem of the T fits snugly into a groove or gap between the floors, while the flat top covers the joint seamlessly.
This design allows for slight expansion and contraction of materials without compromising the junction’s stability. Pay attention to the thickness of your flooring to select a T moulding with matching dimensions.
Standard sizes vary, so measuring your floor thickness and gap length accurately is critical to ensure the moulding sits flush and protects the edges effectively.
Frequently Asked Questions
Can T Moulding Be Painted or Stained After Installation?
Yes, you can paint or stain T moulding after installation, but it depends on the material.
If it’s wood or MDF, staining or painting is straightforward. Just prep the surface by cleaning and lightly sanding.
For metal or vinyl moulding, painting may require a primer suited for those materials.
Be sure to choose finishes that match your flooring and protect the moulding from wear.
Always let it dry fully before walking on it.
How Do You Remove Old T Moulding Without Damaging the Floor?
Think of peeling a delicate leaf from a tree without tearing it.
To remove old T moulding, gently pry up the edges with a putty knife or flat pry bar, working slowly to avoid scratching the floor.
If adhesive’s involved, soften it first with a heat gun or hairdryer.
Lift carefully along the length, supporting the floor around the moulding, so you protect both surfaces while taking it out cleanly.
What Maintenance Is Required to Keep T Moulding Looking Good?
To keep your T moulding looking good, clean it regularly with a damp cloth to remove dust and dirt.
Avoid harsh chemicals that could damage the finish.
Check for any lifting or gaps, and reapply adhesive if needed.
If it’s wood or aluminum, consider polishing or applying a protective finish occasionally.
Promptly address any scratches or dents to maintain its seamless, polished appearance.
Are There Eco-Friendly Materials Available for T Moulding?
You’ll find eco-friendly T moulding options that practically save the planet one floor junction at a time.
Look for mouldings made from bamboo, reclaimed wood, or recycled aluminum. These materials reduce waste and minimize environmental impact.
Bamboo grows rapidly, making it a sustainable choice. Recycled aluminum cuts down on mining.
Choosing these options helps you maintain beautiful flooring junctions without compromising your eco-conscious values.
Can T Moulding Be Used Outdoors or in Moisture-Prone Areas?
You generally shouldn’t use standard T moulding outdoors or in moisture-prone areas, as most are designed for indoor, dry environments.
Moisture can cause swelling, warping, or mold, especially with wood or laminate versions.
However, if you select T moulding made from moisture-resistant materials like aluminum or PVC, you can install it outdoors or in damp places.
Always check the product specifications to make certain it’s suitable for those conditions before proceeding.
Final Thoughts on What T Moulding Does for Your Floors
Now that you know how T moulding acts like the unsung hero connecting different floors, you’re ready to make your space flow seamlessly.
Just like a skilled conductor unites an orchestra, this simple strip keeps your flooring transitions smooth and safe.
Measure carefully, choose the right material, and install with precision. Your floors will thank you.
With T moulding, you’re not just finishing a floor; you’re perfecting your home’s harmony.