How to Tell if Garage Door Is Insulated: Quick Guide
You can tell if your garage door is insulated by knocking on the panels. Solid, muffled sounds usually mean insulation inside.
Check the door’s thickness: insulated doors are about 1.5 to 2 inches thick. Look for a finished, smooth back panel covering foam or fiberglass.
You can also feel for drafts or use a thermometer to spot temperature differences between inside and outside.
Finally, look for labels that list insulation type and R-value. Keep exploring to discover detailed tips and upgrade advice.
Key Takeaways
- Check for a thick foam or fiberglass layer sandwiched between panels, typically 1.5 to 2 inches thick, indicating insulation.
- Tap the door panels; a solid, muffled sound suggests insulation, while a hollow echo indicates no insulation.
- Measure the door edge thickness; insulated doors usually measure around 2 inches, non-insulated closer to 1 inch or less.
- Look for a smooth, finished interior panel in white, beige, or gray hiding metal ribs and gaps, which signals insulation.
- Locate and read the door label for insulation type and R-value; R-values of 9 or above indicate well-insulated doors.
How To Identify Garage Door Insulation By Visual Inspection?

You can often quickly tell if your garage door is insulated by simply looking at its interior panels.
Check if you see a thick layer of foam or fiberglass sandwiched between the panels. That’s a clear sign of insulation.
Insulated doors usually have a smooth, finished back panel, often in white, beige, or gray. This hides the metal ribs and gaps you’d spot in non-insulated doors.
Measure the thickness if you can; insulated doors are typically 1.5 to 2 inches thick, while non-insulated ones are thinner and single-layered.
You might also notice the original panel design concealed beneath a polystyrene or polyurethane layer. This adds to the door’s sturdiness and energy efficiency.
This quick visual check helps you identify insulation without tools or complex steps.
For safety during inspection or any garage door work, wearing protective gear is recommended to avoid dust and debris exposure.
How To Use The Knock Test To Check Garage Door Insulation?
You can easily find out if your garage door is insulated by doing what’s called the knock test. Just tap on a few panels using your knuckles or even the handle of a wooden spoon. If you hear a solid, muffled sound, that’s a good sign—it means you probably have insulation. On the flip side, if you get a hollow, tinny echo, that suggests your door mightn’t be insulated at all.
It’s a smart idea to test multiple panels, too. This way, you can make sure you’re getting consistent and accurate results. Happy testing! Proper insulation also helps maintain indoor humidity levels, which is important for protecting surrounding hardwood floors from moisture damage.
Sound Differences Explained
How can you quickly determine if your garage door is insulated without special tools? Simply use the knock test.
Tap the door’s surface with your knuckles or the handle of a wooden spoon. Listen closely to the sound it makes.
If you hear a solid, muffled thump, that’s a strong sign insulation is present. Insulated doors have a thick foam or fiberglass layer that absorbs sound, dulling the knock.
On the other hand, a hollow or tinny echo usually means there’s no insulation behind the panel. This sound difference happens because non-insulated doors are mostly thin metal and empty space, causing the knock to reverberate.
Using this quick, practical test helps you confirm insulation without needing any tools or dismantling the door. Maintaining stable indoor humidity can also enhance the effectiveness of garage insulation by reducing moisture-related damage.
Testing Multiple Panels
Testing multiple panels when performing the knock test guarantees a reliable assessment of your garage door’s insulation.
Start by tapping several panels across the door with your knuckles or a wooden spoon handle.
Pay attention to the sound each panel produces. Solid, muffled knocks usually mean insulation is present, while hollow or tinny echoes suggest the door lacks insulation.
Checking just one panel might give misleading results since some doors have mixed panel types or damaged insulation.
By testing multiple spots, you ensure consistency and accuracy in your evaluation.
If most panels sound solid, your door is likely insulated. If many panels produce hollow sounds, insulation is probably missing or compromised.
This quick, tool-free method helps you confidently determine your garage door’s insulation status.
Maintaining consistent environmental conditions can also help preserve your garage door’s insulation effectiveness over time.
How To Measure Garage Door Thickness For Insulation Clues?
Measure the thickness of your garage door by feeling its edge or using a ruler for an accurate reading. Insulated doors typically measure about 2 inches thick, while non-insulated ones are closer to 1 inch or less.
Run your hand along the door’s side edge to sense a solid, thick construction, which suggests insulation inside. If you use a ruler or tape measure, check multiple spots to confirm consistent thickness.
Keep in mind that a thicker door usually means it contains foam or fiberglass between panels, enhancing insulation. Comparing your door’s thickness to known insulated models can also help.
This simple measurement offers a practical clue about your door’s insulation without needing special tools or invasive inspection. Proper insulation enhances durability and energy efficiency, similar to how underlayment benefits engineered hardwood flooring.
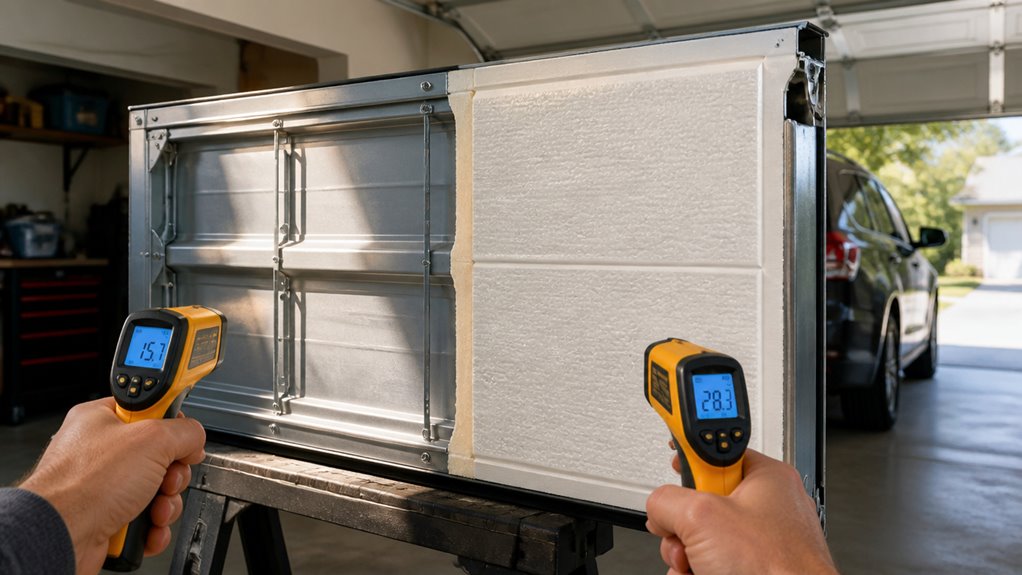
How To Check Temperature Differences For Garage Door Insulation?
Check the temperature differences on both sides of your garage door during extreme weather to identify insulation effectiveness.
Use a digital or infrared thermometer to measure the surface temperature inside your garage door and then outside it.
For accuracy, wait about 30 minutes to let the door reach thermal equilibrium with the environment.
If your garage door is insulated, you’ll usually see a temperature difference of 10 to 20 degrees between the two sides.
A smaller or negligible difference often means poor or no insulation.
Also, feel for drafts around the door edges during hot or cold days; drafts indicate insufficient insulation.
This simple temperature test helps you quickly assess whether your garage door provides effective thermal resistance and energy efficiency.
To improve insulation performance, maintaining indoor humidity and temperature within optimal ranges is beneficial during testing.
How To Check Door Labels For Insulation Information?
Sure! Here’s a more conversational version:
First things first—let’s find that door label. You’ll usually spot it on the edge where the door meets the frame or maybe along the inside track area. Once you’ve located it, take a look for some important details like the insulation type and the R-value. These tell you how well the door does at resisting heat transfer.
If the label is a little hard to read or missing some info, no worries! You can always hop onto the manufacturer’s website. Just grab your door’s model number, and you should be able to find the exact insulation specs you need. Easy peasy!
Also, keep in mind that maintaining stable environmental conditions during installation can help preserve the door’s insulation performance over time.
Locate Door Label
When inspecting your garage door for insulation details, you’ll want to locate the door label, which often provides essential information about its construction.
Start by checking the edges of the door panels, especially where the door meets the frame. Look for stickers or metal plates; these labels are commonly placed on the side edge or near the bottom.
You might also find labels inside the track area or on the interior surface of the door. The label typically includes the manufacturer’s name, model number, and vital insulation details such as the R-value or type of insulation used.
Keep a flashlight handy to spot faded or hidden labels. Once you find it, note the information carefully as it’s key to understanding your door’s insulation without guessing.
To maintain the door’s insulation effectiveness, consider using waterproof sealant around the edges to prevent moisture from compromising the insulating materials.
Interpret Insulation Details
Understanding your garage door’s insulation details hinges on interpreting the information found on its label. Once you locate the label, look for key specs like insulation type, R-value, and panel thickness.
These details clarify the door’s energy efficiency and soundproofing capabilities. If the label shows a high R-value (typically 9 or above), you’re likely dealing with well-insulated panels. Insulation types like polystyrene or polyurethane often appear on the label, too.
Here’s a quick reference table to help you decode common insulation details:
| Insulation Type | Common R-Value Range |
|---|---|
| Polystyrene | 6 to 9 |
| Polyurethane | 12 to 18 |
| Fiberglass | 6 to 12 |
| No Insulation | 0 to 1 |
| Unknown/Unlabeled | Check manufacturer |
Use this info to confirm your door’s insulation quality. Proper insulation and moisture barriers are essential to prevent damage caused by temperature fluctuations and maintain durability.
Identifying Insulation By Inspecting Interior Garage Door Panels
Examine the interior panels of your garage door closely to spot signs of insulation. Look for a finished, smooth back panel, usually in white, beige, or gray, which indicates insulation.
Insulated doors often have a thick foam or fiberglass layer sandwiched between panels, measuring about 1.5 to 2 inches thick. You won’t see exposed metal ribs or gaps, which are common in non-insulated doors.
Instead, the original panel design is hidden under a polystyrene or polyurethane layer. Run your hand over the surface to feel the solid, thicker construction compared to a thin, single-layer door.
This inspection gives you a practical way to confirm insulation without removing panels or using special tools. It helps you understand your garage door’s thermal efficiency better.
For maintaining this efficiency, it is important to avoid unnecessary removal or damage, similar to how preserving baseboards during refinishing ensures a seamless, damage-free finish.
How R-Value Affects Garage Door Insulation Performance?
Although you mightn’t see insulation directly, the R-value of your garage door plays a crucial role in its performance. It measures how well it resists heat transfer.
The higher the R-value, the better your door keeps heat out in summer and retains warmth in winter. This improves comfort and energy efficiency.
Here’s how R-value affects your garage door insulation:
R-value 6 suits mild climates, offering basic resistance.
Values between 9-12 work well for typical homes.
R-value 12-18 fits colder or hotter regions for better protection.
Over 18 is ideal for extreme weather, maximizing insulation.
Higher R-value means less heat transfer, quieter operation, and longer door life.
Choosing the right R-value matches your local climate and insulation needs precisely.
Benefits Of Installing An Insulated Garage Door
Choosing the right R-value for your garage door not only improves temperature control but also brings several practical benefits.
You’ll notice reduced energy bills since insulated doors minimize heat loss in winter and keep heat out in summer. This means your HVAC system won’t have to work as hard, saving you money.
Additionally, insulated doors operate more quietly, cutting down on noise from outside or the door mechanism itself. You’ll also enjoy a longer-lasting door because insulation adds strength and durability, protecting panels from dents and warping.
Finally, a well-insulated garage door improves comfort if you use your garage as a workspace or entryway. It maintains a more consistent temperature and reduces drafts.
These benefits make insulation a smart investment for your home.
When To Upgrade To A Better-Insulated Garage Door?
Knowing when to upgrade to a better-insulated garage door can save you money and improve comfort markedly.
You should consider upgrading if your current door shows signs of poor insulation or no insulation at all. Here are key indicators:
You feel significant temperature swings or drafts in your garage. Your energy bills are higher than expected, especially in extreme weather.
The door is thin (around 1 inch) or produces a hollow sound when knocked. You use your garage as a workspace or living area and need better climate control.
Your current door’s R-value is below 9, which is insufficient for moderate to cold climates.
Upgrading helps reduce heat transfer, lowers energy costs, and creates a quieter, more durable garage space.
Frequently Asked Questions
Can Insulation Improve My Garage Door’s Noise Reduction?
Yes, insulation can markedly improve your garage door’s noise reduction.
When you add insulation, it creates a thicker, denser barrier that muffles sounds from outside and reduces echoes inside.
This means less street noise and quieter operation when opening or closing the door.
Plus, insulated doors often feature foam or fiberglass layers that absorb sound waves, making your garage a more peaceful space overall.
How Does Garage Door Insulation Impact Home Energy Bills?
Sure, you love throwing money out the window, so don’t insulate your garage door!
But if you want to keep cash in your wallet, insulation helps reduce heat transfer, cutting your energy bills.
It maintains stable temperatures, so your HVAC doesn’t work overtime.
With better insulation, you’ll see lower heating and cooling costs, quieter operation, and longer door life.
All practical perks that save you money and hassle in the long run.
What Types of Foam Are Used in Garage Door Insulation?
You’ll find two main types of foam used in garage door insulation: polystyrene and polyurethane.
Polystyrene foam is rigid, affordable, and offers decent insulation.
Polyurethane foam provides a higher R-value, meaning better thermal resistance.
It also adds strength and durability to the door.
When choosing, consider your climate and budget.
Polyurethane’s superior insulation helps reduce energy costs more effectively in colder or hotter areas.
Does Insulated Garage Door Maintenance Differ From Non-Insulated Doors?
You’ll find that caring for an insulated garage door is a bit gentler than treating a non-insulated one.
Since insulation adds thickness and sensitivity, you’ll want to avoid harsh chemicals that could damage the foam or panel finishes.
Routine checks for seal integrity and cleaning with mild soap keep it efficient.
Non-insulated doors might tolerate rougher handling, but insulated doors benefit from your careful, consistent maintenance to preserve their energy-saving perks.
Can I Add Insulation to an Existing Non-Insulated Garage Door?
Yes, you can add insulation to an existing non-insulated garage door.
You’ll want to use foam board or reflective foil insulation panels cut to fit between the door’s metal ribs.
Secure them with adhesive or double-sided tape.
Adding insulation improves energy efficiency and noise reduction.
Just be sure to check that the added thickness doesn’t interfere with the door’s operation or weather seals.
It’s a practical, affordable way to upgrade your door’s performance.
Make Your Garage More Comfortable Year-Round
If you want to avoid turning your garage into a freezing cave or a sweltering oven, knowing how to spot insulation is non-negotiable.
Trust me, an uninsulated garage door can feel like the wild outdoors invading your space.
By using simple tricks like the knock test, checking thickness, or reading labels, you can quickly tell if your door’s up to the task.
Don’t settle for less; your comfort depends on it!