How to Paint a Laminate Floor: Basic to Beautiful
To paint a laminate floor, start by thoroughly cleaning and lightly sanding the surface to remove gloss. Repair any holes with caulk, then apply a high-quality bonding primer tinted to your desired color for better coverage.
Use brushes and rollers to paint thin, even coats in the direction of the floor panels, letting each coat dry 3–4 hours. After fully curing for 24 hours, protect the finish with furniture pads and rugs.
For a more detailed step-by-step process, keep exploring these essential techniques.
Key Takeaways
- Thoroughly clean, repair, and lightly sand the laminate floor to ensure paint adhesion and remove surface gloss.
- Apply a high-quality bonding primer evenly, allowing it to dry completely before painting.
- Use a brush for edges and a roller for large areas, applying multiple thin coats of water-based floor paint.
- Let each coat dry for 3–4 hours, maintaining good ventilation and avoiding pooling or streaks.
- Allow the final coat to cure for at least 24 hours before use, and protect the floor with furniture pads and rugs.
Should You Paint Your Laminate Floor? Pros And Cons

Before you plunge into painting your laminate floor, it’s important to weigh the pros and cons carefully.
Painting can refresh worn or outdated floors, giving you a budget-friendly way to customize your space with color or a new look.
Painting offers an affordable way to revitalize worn floors and add a fresh splash of color.
It’s quicker and less expensive than replacing the entire floor.
However, painted laminate isn’t as durable as original flooring.
Scratches and scuffs can show easily, and paint may chip over time, especially in high-traffic areas.
You’ll need to prep thoroughly and accept that this is more of a cosmetic fix than a permanent solution.
If you want a long-lasting surface, painting mightn’t meet your needs.
But if you’re after an affordable, temporary style update, it could be just right for you.
Proper surface preparation is essential to improve paint adhesion and durability.
Gather Materials For Painting Laminate Floors
To successfully paint your laminate floor, you’ll need several essential materials that ensure proper adhesion and a smooth finish.
Start with cleaning products to remove dust and debris thoroughly.
Grab sanding equipment: an orbital sander and 120-220 grit sandpaper work best for edges and larger areas.
A deglosser helps strip the glossy plastic layer, improving paint bonding.
Keep repair caulk handy to fill any holes or cracks before painting.
Choose a high-quality bonding primer designed for laminate surfaces, such as Valspar, to guarantee paint sticks well.
Finally, select a water-based floor or porch paint for quick drying and durability, with one gallon covering about 400 square feet.
Proper surface preparation, including cleaning and leveling, is essential for long-lasting results when working with laminate floors and similar flooring types.
Prepare Your Laminate Floor For Painting
Before you dive into painting, it’s really important to give your laminate floor a good clean. You want to get rid of all that dust, dirt, and any little bits of debris.
Once that’s done, take a close look at the floor. Do you see any holes, cracks, or scuffs? If you do, grab some caulk and fill those in. This will help create a nice, smooth surface for your paint.
Next up, you’ll want to lightly sand the floor using some fine-grit sandpaper. This step is crucial because it helps the paint stick better, but don’t worry—you won’t damage the laminate if you’re gentle.
Just a little scuffing will do the trick!
To ensure the best results, it’s also important to acclimate the flooring to the room’s environment before starting your project.
Clean Thoroughly Before Starting
When preparing your laminate floor for painting, start by thoroughly cleaning the surface to remove all dust, dirt, and debris.
Begin with a vacuum to pick up pet hair, crumbs, and grit trapped in seams. Follow with a damp mop using a gentle cleaner suitable for laminate floors; avoid excess water that can seep into joints.
Wipe stubborn spots with a soft cloth and mild detergent, guaranteeing no residue remains. Let the floor dry completely before moving on.
This meticulous cleaning prevents paint adhesion problems and guarantees a smooth finish. Skipping this step risks peeling paint or uneven coverage.
Taking time here sets a solid foundation, making your painted floor look professional and last longer. Clean floors are essential for every painting project’s success.
Using a vacuum with a soft-bristled brush attachment helps remove fine dust and debris effectively before painting.
Repair Surface Imperfections
Once your floor is spotless and dry, take a close look for any deep marks, cracks, or scuffs that could affect the final paint job.
Addressing these imperfections now guarantees a smooth, professional finish. Here’s how to repair surface flaws effectively:
- Identify all damaged spots by carefully inspecting the floor under good lighting.
- Use a high-quality repair caulk designed for laminate to fill holes, cracks, and deep scuffs.
- Smooth the caulk with a putty knife, removing excess to level it with the floor surface.
- Allow the caulk to dry completely according to the manufacturer’s instructions before moving on.
Fixing these imperfections now prevents paint from peeling or cracking later. This sets your laminate floor up for a flawless paint application.
When dealing with any adhesive residues before painting, always take safety precautions to avoid damage or health risks.
Sand For Better Adhesion
Sanding your laminate floor removes its glossy sheen and creates a rougher surface that helps paint adhere more effectively.
Begin by using an orbital sander with 120-220 grit sandpaper for the main areas, switching to hand sanding for edges and corners.
Sand lightly to avoid damaging the laminate beneath the surface.
Focus on achieving a dull finish rather than removing material completely.
After sanding, vacuum or sweep thoroughly to eliminate all dust and debris, as leftover particles can interfere with paint bonding.
Optionally, apply a deglosser to break down any remaining glossy plastic layer for even better adhesion.
Taking the time to sand properly guarantees your primer and paint will stick well, improving durability and preventing peeling over time.
For enhanced adhesion and durability, consider applying a moisture barrier or sealant after sanding to protect the floor from potential water damage.
Prime Laminate Flooring For Best Adhesion
Apply a high-quality bonding primer evenly across your prepared laminate floor to ensure the paint adheres properly. This step is essential to create a stable base that helps the paint stick and last longer.
Applying a quality bonding primer ensures paint adhesion and creates a lasting, stable base on laminate floors.
Use a roller for large sections and a brush for edges and corners to guarantee full coverage.
Follow these steps for priming success:
- Tint the primer to match your final paint color to reduce the number of paint coats needed.
- Allow the primer to dry completely, usually about 24 hours, before proceeding.
- Apply a second primer coat if you want a smoother, more even finish.
- Lightly sweep the floor to remove any dust or debris before painting.
Priming properly sets the stage for a durable, flawless finish. Because the laminate’s top layer is a sealed, non-porous wear layer, proper priming is crucial for paint adhesion and longevity.
Step-By-Step Guide To Painting Laminate Floors
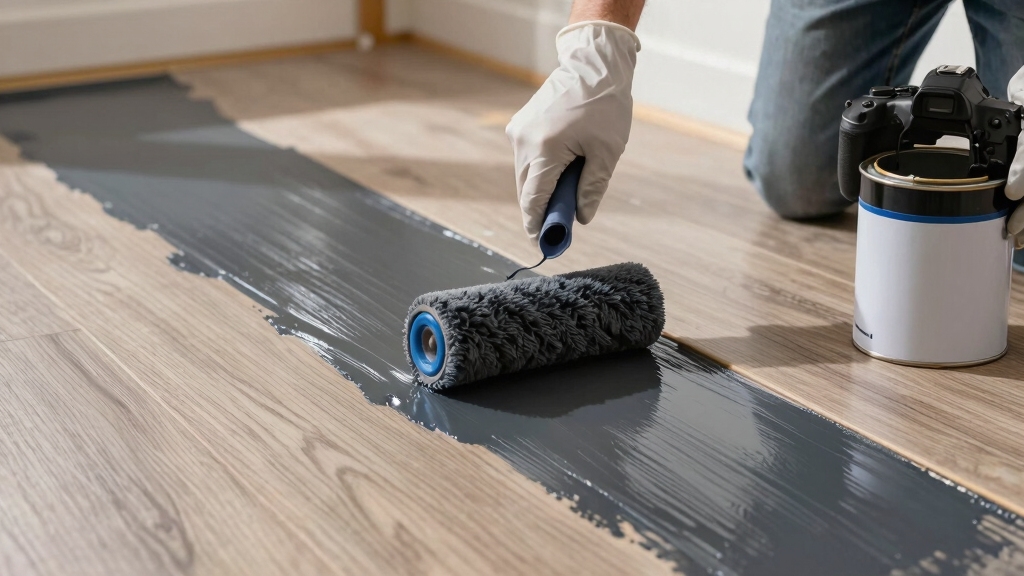
Before you start painting, prepare your tools by selecting a high-quality brush for cutting in along edges and a roller for covering larger floor areas.
Begin by using the brush to carefully paint corners, baseboards, and around fixtures, ensuring clean, sharp lines.
Next, load your roller evenly with floor paint and apply it in the direction of the floor panels for a smooth, uniform finish.
Apply the first coat evenly, avoiding pooling or streaks.
Let it dry for 3-4 hours, then inspect the coverage.
Apply a second coat the same way for better opacity, and add a third coat if needed to fully conceal the original laminate surface.
Maintain consistent pressure and overlap strokes slightly to avoid visible roller marks.
For best results, ensure the surface is thoroughly cleaned and lightly sanded before painting to improve paint adhesion.
Drying And Curing Painted Laminate Floors
Once you’ve completed the final coat of paint, you’ll need to allow the floor at least 24 hours to cure fully before moving furniture back in. This curing time guarantees the paint hardens properly, reducing the risk of damage or sticking.
Allow your painted floor to cure for 24 hours before moving furniture to ensure a durable, damage-free finish.
Water-based paints usually dry faster, but don’t rush the process.
To help the paint cure evenly and maintain its durability, follow these steps:
- Keep the room well-ventilated with windows or fans to speed drying.
- Avoid walking on the floor during the curing period.
- Maintain a stable room temperature to prevent uneven drying.
- Refrain from placing rugs or heavy objects on the floor until fully cured.
Giving your painted laminate floor proper drying and curing time guarantees a smooth, lasting finish. Factory-applied finishes, like those used in prefinished hardwood flooring, demonstrate the benefits of proper curing for durability and longevity.
Test Paint Durability And Protect Painted Laminate Floors
Once your paint has fully cured, it’s a good idea to test its durability. Just gently scratch the surface with your fingernail or a screwdriver. This will help you see if there’s any damage.
To keep your newly painted floor looking great, don’t forget to add felt pads to the bottoms of your furniture. This little step can really help prevent scratches and scuffs.
And remember, the curing time is super important! It ensures that the paint bonds properly and can handle daily wear and tear. So, be patient and let it do its thing!
For added maintenance, regularly clean your floor with a microfiber mop and avoid harsh chemicals to preserve the paint finish.
Scratch Testing Methods
To check how well your painted laminate floor holds up, you’ll want to carry out scratch testing using simple tools like a fingernail or screwdriver. This helps you assess the durability of the paint and decide if additional coats or sealants are necessary.
Here’s how to perform effective scratch tests:
- Gently drag your fingernail across a small, inconspicuous area to simulate everyday wear.
- Use the tip of a screwdriver to apply slightly more pressure and check for paint chipping.
- Inspect the tested spots carefully for any peeling or scratches.
- Repeat tests after the paint has fully cured (at least 24 hours) for accurate results.
Perform these tests before heavy use to make certain your floor’s finish stays intact longer.
Furniture Protection Tips
Although your painted laminate floor can look stunning, protecting it from furniture damage is essential to maintain its finish and durability.
First, test paint durability by gently scratching a hidden spot with your fingernail or screwdriver after curing. This helps you gauge its resistance.
Next, always attach felt pads or rubber caps to the bottoms of your furniture legs to prevent scratches and gouges when moving items.
Avoid dragging heavy furniture across the floor; instead, lift and carry pieces to reduce abrasion.
Use area rugs in high-traffic zones to shield the paint from wear. Regularly check pads for wear and replace them as needed.
Taking these steps guarantees your freshly painted laminate floor remains beautiful and lasts longer under everyday use.
Curing Time Importance
Because curing allows the paint to fully harden and bond with the laminate surface, you need to wait at least 24 hours before placing furniture back on your floor.
This waiting period assures the paint’s durability and prevents damage. To protect your newly painted floor and confirm its strength, follow these steps:
- Perform a scratch test using your fingernail or a screwdriver to check paint adhesion after curing.
- Add felt pads to furniture bottoms to prevent scratches and wear.
- Avoid heavy traffic or placing rugs with rubber backing until the paint fully cures.
- Remember, full adhesion improves over time, so treat your floor gently during the first week.
Adhering to curing time guarantees a longer-lasting, beautiful finish on your laminate floor.
Frequently Asked Questions
How Long Does Painted Laminate Flooring Typically Last Before Needing Touch-Ups?
Painted laminate flooring typically lasts around 3 to 5 years before you’ll need touch-ups. This depends on foot traffic, paint quality, and prep work.
If you sand properly and use a high-quality bonding primer with multiple paint coats, your floor will resist wear longer.
However, scratches and scuffs are common, so expect periodic maintenance. Adding felt pads under furniture and avoiding harsh cleaners will help extend the paint’s durability.
Can I Use Oil-Based Paint Instead of Water-Based on Laminate Floors?
You can use oil-based paint on laminate floors, but it’s not usually recommended because it takes longer to dry and emits stronger odors.
Water-based paint dries faster, minimizing downtime, and offers easier cleanup.
If you choose oil-based, expect extended curing times and increased ventilation needs.
Also, oil-based paint may not bond as well without proper sanding and priming.
Be sure to prepare the surface thoroughly for better adhesion and durability.
What Are the Best Tools for Achieving a Smooth Finish on Laminate?
You’ll want an orbital sander with 120-220 grit sandpaper to smooth the surface and edges without damaging the laminate.
Use a high-quality roller for large areas to guarantee even paint application, and a good brush for cutting in corners and edges precisely.
A deglosser can help the paint bond better.
Finally, keep a vacuum or broom handy to remove dust between sanding, priming, and painting for a flawless finish.
Is It Safe to Paint Laminate Floors in Humid or Damp Environments?
You might worry that painting laminate floors in humid or damp environments isn’t safe, but you can do it if you prepare properly.
Make sure the floor is completely dry before starting. Use a high-quality bonding primer designed for moisture resistance.
Water-based paints dry faster and handle humidity better. Still, avoid painting if moisture levels are too high, as the paint may peel.
Guarantee good ventilation and low humidity during application and curing.
How Do I Remove Paint From Laminate Floors if I Want to Revert?
To remove paint from laminate floors, start by gently scraping off excess paint with a plastic scraper to avoid damage.
Then, apply a small amount of rubbing alcohol or a commercial adhesive remover to a soft cloth and rub the paint spots carefully.
Avoid harsh chemicals that can ruin laminate. Wipe the area with a damp cloth afterward, and let it dry.
Test any remover in a hidden spot first to make certain it won’t harm your floor’s finish.
Transform Your Laminate Floor into a Lasting Masterpiece
Painting your laminate floor can breathe new life into your space, but it’s not a decision to take lightly. With proper prep, priming, and patience, you’ll create a finish that sticks like glue and stands up to daily wear.
Just remember, the key to success lies in careful steps and protective measures. Follow the guide closely, and you’ll turn your floor into a masterpiece that’s both beautiful and durable.
It will be a true work of art underfoot.