How to Stagger Hardwood Floors: Weaving Strength Into Plank
When staggering hardwood floors, offset each plank’s end joint by at least six to ten inches, six inches for narrow planks, and up to ten inches for wider ones, to guarantee structural strength and a natural look.
Avoid aligning seams directly to prevent weak points and gaps caused by expansion. Use varied plank lengths for a random pattern, mark your subfloor for precision, and maintain proper expansion gaps around edges.
Following these steps sets a solid foundation for both durability and aesthetics, with more detailed techniques to take into account.
Key Takeaways
- Offset end joints between rows by at least 6 inches for narrow planks and 8-10 inches for wider planks to ensure structural integrity.
- Use random plank lengths and vary starting board lengths in each row to create a natural, non-repetitive stagger pattern.
- Mark stagger points on the subfloor with chalk lines before installation for accurate alignment and consistent spacing.
- Avoid aligning joints side-by-side to prevent weak H-joints and distribute stress evenly across the floor.
- Leave expansion gaps of 1/4 to 3/4 inch around walls using spacers to accommodate wood movement and prevent buckling.
Importance of Staggering Hardwood Floors
You stagger hardwood floor planks. You considerably enhance the structural integrity of your flooring by offsetting seams between adjacent rows, which prevents weak points and guarantees even weight distribution. This approach reduces localized stress, minimizing the risk of warping and buckling by allowing slight flex under pressure without damaging plank joints.
Additionally, staggering often involves cutting planks to different lengths, avoiding end-to-end alignment to create a more stable and aesthetically pleasing layout.
When combined with nail-down installation, staggering markedly increases floor stability, reducing movement or shifting over time. Proper maintenance practices help preserve this stability by preventing wear that could compromise staggered joints.
Proper staggering also prevents seam alignment, which can lead to gaps or buckling from seasonal expansion and contraction. By distributing weight evenly and reinforcing mechanical bonding, staggering extends your floor’s lifespan.
Additionally, it distributes foot traffic stress evenly, preventing premature damage and maintaining the floor’s durability and appearance with less frequent repairs.
Recommended Stagger Distances for Different Plank Sizes
When staggering narrow planks up to 3 inches wide, maintain a minimum 6-inch offset to prevent weak joints. For wider planks over 5 inches, increase stagger distance to 8-10 inches to enhance floor stability and aesthetics.
Consistently applying these stagger distances guarantees a durable, professional hardwood floor installation. It is also important to allow the floor finish to fully cure before laying additional materials, following recommended curing times to protect the surface.
Additionally, proper staggering helps avoid H-joints and repetitive patterns, ensuring a more natural and stable floor appearance.
Narrow Plank Staggering
Although narrow hardwood planks measure less than three inches in width, you should stagger their end joints by at least six inches to guarantee structural stability and visual appeal. This six-inch minimum offset distributes seams effectively, preventing plank separation and enhancing floor durability.
Proper staggering enhances floor stability by distributing seams evenly across the surface, which prevents alignments that can weaken the flooring structure over time. Maintaining consistent stagger distances also helps in managing moisture expansion to reduce the risk of warping.
Always ensure adjacent rows’ end joints are offset by a minimum of two inches to maintain integrity and avoid weak points. Use a tape measure and utility knife to cut planks precisely, especially around obstacles.
A rubber mallet can help secure each plank firmly in place. Regularly check your layout to avoid repetitive patterns, which can detract from the floor’s natural appearance. Maintain a consistent stagger pattern throughout installation to achieve both structural soundness and a visually appealing hardwood floor.
Wide Plank Recommendations
Since wide hardwood planks experience greater expansion and contraction, staggering their end joints at least 8 to 10 inches apart is critical for maintaining floor stability and visual consistency. Proper maintenance, such as regular vacuuming frequency can also help preserve the floor’s integrity over time.
You should avoid repeating the same stagger length to prevent predictable joint patterns. Begin the second and subsequent rows with plank cuts that guarantee stagger distances meet or exceed this 8-inch minimum.
Alternate starting plank lengths full plank followed by cut plank to maintain proper spacing. Also, never align joints vertically between adjacent rows to prevent weak points.
Employ a random pattern with varied plank widths to enhance natural variation and reduce visible seams. This wider stagger distance distributes stress evenly across the floor, reinforcing structural integrity and minimizing risk of warping or joint failure under foot traffic.
Using a random pattern not only helps reduce waste by utilizing leftover planks but also creates a rustic, energetic flow that complements the staggered layout.
Stagger Distance Importance
Proper staggering of hardwood floor planks considerably affects both the strength and appearance of your installation.
You should stagger end joints by at least twice the plank width to ensure structural integrity. For 4-inch-wide planks, maintain a minimum stagger distance of 8 inches; for 6-inch planks, increase that to 12 inches.
Avoid aligning end joints vertically or creating stair-step or H-joint patterns, as these weaken the floor and look unnatural. Using harder species like Hickory or Maple can enhance the floor’s resistance to denting and wear due to their higher Janka hardness ratings.
Consistently randomize joint placement row-to-row, beginning with longer boards in the first row to establish stability. Proper staggering distributes weight evenly, reduces joint separation, and prevents squeaking. This method also enhances structural stability by evenly distributing weight across the flooring.
Remember to maintain a ¾-inch expansion gap around room edges independently of stagger distances to accommodate wood movement without compromising floor performance or appearance.
Techniques for Achieving a Natural Stagger Pattern
To achieve a natural stagger pattern, start by applying the brick-lay method. This ensures each row’s end joints offset by at least six inches from adjacent rows. Incorporate random plank lengths to disrupt uniformity.
This helps prevent repetitive patterns that can look artificial. This combination not only enhances the structural integrity but also creates an organic appearance for your hardwood floor.
Using random length pattern techniques is a classic and versatile approach that mimics traditional flooring, adding authenticity to the design. Additionally, considering the plank size and orientation can further enhance the visual effect and spaciousness of the floor layout.
Brick-Lay Method
When you apply the brick-lay method, you stagger the end joints of hardwood floorboards so they don’t align directly between adjacent rows, creating a natural offset pattern. Typically, you offset joints by one-third to one-half the board length, ensuring no two consecutive rows share identical joint locations.
Begin by measuring and cutting boards precisely, using partial boards at row starts to maintain stagger and reduce waste. Using transition strips can help manage any height differences when adjoining different flooring materials.
Mark stagger points on the subfloor with chalk lines before installation, and alternate starting board lengths for each row. Before adhering the boards, it is helpful to lay out sections to visualize the pattern and ensure proper alignment, similar to how pattern layout and visualization are approached in brick installation.
Maintain a minimum 4 to 8-inch offset between joints to enhance floor stability and prevent weak points. Regularly check alignment during installation, using spacers to preserve expansion gaps and a mallet to fit boards tightly without disturbing the staggered pattern.
Using Random Lengths
Staggering hardwood floorboards with random lengths enhances the natural appearance and structural integrity beyond the brick-lay method. Start each new row by cutting the first plank to a random length, ensuring at least a 6-inch offset from joints in the previous row.
Avoid lining up seams in adjacent rows to prevent weak spots and continuous seams. Measure accurately before cutting to guarantee a tight fit and consistent stagger. Proper inspection and repair of damaged boards prior to installation help maintain structural integrity.
Use a utility knife or saw depending on plank thickness, and tap planks into place with a rubber mallet and tapping block to protect edges. Maintain an expansion gap along walls and regularly check floor alignment to prevent H-joints. This method prevents seam alignment, which avoids weak spots in the floor and enhances durability.
Mix plank lengths beforehand to plan the stagger pattern, using various lengths to achieve an organic, natural wood floor look. Ensuring proper environmental conditions during installation, such as stable humidity and temperature, helps prevent future warping or buckling.
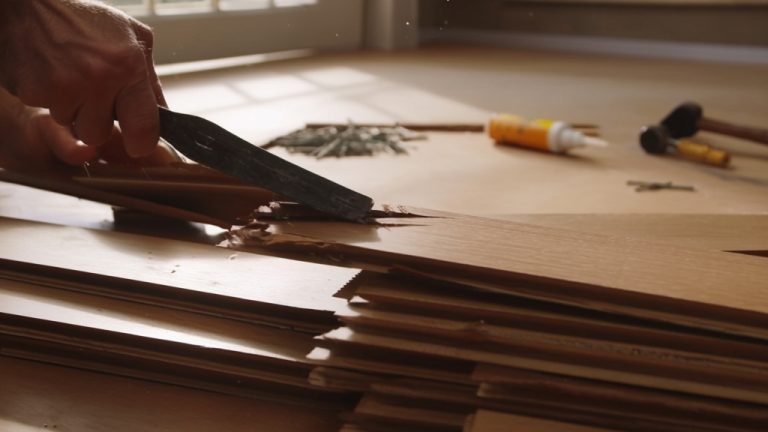
Essential Tools and Installation Tips
Although installing hardwood floors demands precision, having the right tools and following key installation tips will streamline the process and guarantee a professional finish.
Start by measuring accurately with a tape measure and marking straight lines using a chalk line. Confirm subfloor flatness with a level before cutting boards with a table saw or miter saw for precise, clean edges.
Use a moisture meter to check the moisture content of both flooring and subfloor before installation to prevent future warping or damage. Proper moisture control is essential to avoid issues like buckling or warping after installation.
Use a tapping block and pull bar to snugly fit boards without damage. When staggering, offset joints by 6 to 8 inches, avoiding alignment between rows to increase stability and visual appeal. Employ spacers to maintain consistent expansion gaps, and check alignment frequently with chalk lines.
Utilize pneumatic nailers or drills to secure boards efficiently, ensuring a durable, tight floor installation. Regular maintenance and cleaning following installation are crucial to preserve the floor’s finish and longevity.
Managing Expansion Gaps During Installation
Since hardwood naturally expands and contracts with changes in humidity and temperature, you must incorporate expansion gaps during installation to prevent buckling and damage.
Typically, these gaps range from 1/4 to 3/4 inch, depending on room size and flooring type; larger spaces require wider gaps. Place gaps consistently around walls, columns, and vents using spacers to maintain uniform width.
It is important to leave an expansion gap at the perimeter of the flooring to allow for natural movement. Choosing the right finish, such as a matte hardwood floor finish, can also influence the floor’s ability to conceal minor imperfections that may occur over time.
Avoid pressing boards tightly against fixed objects to prevent future warping. Start installation near the room’s center, allowing expansion outward to the perimeter gaps.
For floating floors, maintain a minimum 1/2-inch gap, as the entire floor moves as a unit. Cut boards at row ends to fit with the expansion gap included. Finally, cover gaps with baseboards or molding that don’t restrict floor movement but conceal gaps neatly.
Integrating New Hardwood With Existing Flooring
When integrating new hardwood with existing flooring, you must carefully measure and match the characteristics of the original planks to guarantee a seamless connection. Start by measuring plank dimensions and comparing grain patterns.
Match stain color and sheen by testing samples on new wood. Confirm new hardwood thickness aligns with the existing floor to avoid uneven surfaces. Plan the installation orientation to complement the current layout and maintain stability. Measure length, width, and thickness of existing planks precisely.
Test stain colors on new hardwood to replicate finish. Install new planks perpendicular or diagonal to existing flooring for structural integrity. Use transition strips or moldings to create smooth, visually pleasing joins. This approach ensures functional, aesthetic cohesion between old and new hardwood floors.
Common Mistakes to Avoid When Staggering
Matching new hardwood to existing flooring sets a solid foundation, but proper staggering of the planks is equally important to guarantee structural integrity and aesthetic appeal.
Avoid aligning joints of identical lengths side-by-side; this creates weak H-joints that compromise strength and look repetitive. Maintain a minimum joint offset at least 6 inches for boards under 5 inches wide and equal to plank width for wider boards.
Not racking prior to installing and not laying out planks correctly can lead to uneven visual flow and structural weaknesses, so always plan the layout carefully to mix planks from different boxes for consistency.
Neglecting expansion gaps around walls leads to buckling or cupping; follow manufacturer guidelines for ½ to ¾ inch spacing. Ensure nails or staples are properly spaced every 10-12 inches and driven at the correct depth to prevent squeaks and loosening.
Finally, prep the subfloor meticulously, remove debris, level surfaces, and install moisture barriers to avoid unevenness and premature wear, compromising your floor’s durability, as ignoring poor preparation of the subfloor can cause long-term problems.
Enhancing Visual Appeal Through Random Plank Lengths
Although staggering hardwood floors is essential for structural integrity, incorporating random plank lengths considerably enhances their visual appeal.
By varying plank lengths, you break repetitive patterns, creating a natural, organic look that mimics wood growth. This approach adds character, obscures imperfections, and results in a floor unique to your space.
Additionally, using random lengths can reduce waste during installation by allowing more efficient use of materials. To optimize visual impact, follow these guidelines:
- Start each row with planks of different lengths to avoid uniformity.
- Combine varying widths and lengths for dynamic texture and rhythm.
- Use random lengths to influence spatial perception, making rooms feel cozier or more expansive.
- Ensure seams stagger at least 8 inches apart to maintain strength and avoid clustering.
Implementing these techniques elevates your hardwood floor’s aesthetic while preserving durability and balance.
Frequently Asked Questions
Can Hardwood Floor Staggering Prevent Moisture Damage?
Staggering hardwood floors helps reduce moisture damage by minimizing continuous seams where moisture can infiltrate. You’ll improve structural stability, allowing wood to expand and contract without serious harm.
However, staggering alone won’t fully prevent moisture issues you must also acclimate the wood, use vapor barriers, and control indoor humidity. Together, these steps limit moisture penetration, reducing risks like cupping or warping and extending your floor’s lifespan effectively.
How Does Staggering Affect Hardwood Floor Maintenance?
Staggering hardwood floors means you’ll need to clean more frequently to keep staggered lines sharp and dirt-free. Debris collects unevenly, so regular sweeping or vacuuming is essential.
You should also damp mop carefully and address spills immediately to avoid water damage at joints. While repairs can be trickier due to interlocking seams, proper maintenance like using felt pads and timely refinishing will preserve your floor’s durability and appearance longer.
Is Staggered Hardwood Flooring Suitable for All Wood Species?
Staggered hardwood flooring isn’t suitable for all wood species. You’ll find durable, stable species like oak, maple, and hickory ideal due to their dimensional stability. Softer woods like pine can work but need careful handling.
Exotic species with high oil content or moisture variability may require specialized adhesives and acclimation to prevent issues. Engineered hardwood offers the most versatility, handling staggering well across species thanks to its layered construction.
Can Staggered Floors Improve Sound Insulation?
Yes, staggered floors can improve sound insulation by disrupting vibration paths and reducing structure-borne noise transmission. However, you’ll need to combine staggering with appropriate underlayments, resilient adhesives, and joist insulation to achieve significant impact noise reduction.
Remember, staggering alone won’t control airborne sound, so include mass barriers if airborne noise is a concern. Proper installation is essential—avoid bridging fasteners that can compromise acoustic decoupling and diminish performance.
Does Staggering Impact the Resale Value of a Home?
Staggering hardwood floors doesn’t directly boost your home’s resale value, but it plays a vital role in quality perception. While buyers focus on hardwood presence, inconsistent or poorly staggered planks can signal subpar installation, potentially lowering appeal.
From Careful Planning to Lasting Stability
Think of staggering hardwood floors like weaving a sturdy fabric; each plank’s placement strengthens the whole. By following recommended distances and varying lengths, you create a resilient, visually balanced surface that breathes with natural expansion.
Avoid common pitfalls, use the right tools, and mind your gaps to guarantee lasting stability. With careful planning, your floor won’t just support your steps it’ll symbolize craftsmanship and precision built to endure.