How to Get Stain off Vinyl Siding: Step to a Lasting Shine
To get stains off your vinyl siding, start by cleaning with warm, soapy water to remove surface dirt. For tougher stains, apply an oxalic acid solution or pine-based cleaner, using a soft brush and letting it sit briefly before rinsing gently with low-pressure water.
For stubborn marks like paint or oil, choose oil-based cleaners or specialized stain removers. Always wear gloves, protect nearby plants, and rinse thoroughly afterward. If you’d like more tips on handling persistent stains and maintenance, keep exploring these methods.
Key Takeaways
- Clean vinyl siding by applying a diluted pine-based cleaner with a soft brush, then rinse thoroughly with low-pressure water.
- Use oxalic acid solution (8 oz powder per gallon warm water) for rust or mineral stains, applying after pre-cleaning with soap and water.
- For stubborn stains, apply a pH-neutral, oil-based cleaner like DeckGeneral®, let sit 5–10 minutes, scrub gently, then rinse well.
- Identify stain type first; use mild soap or magic erasers for fingerprint stains, and vinyl-safe removers for dried paint spots.
- Protect plants and wear gloves during cleaning, avoid abrasive tools, and rinse siding from top to bottom to prevent streaks and damage.
Preparing Oxalic Acid Solution for Stain Removal
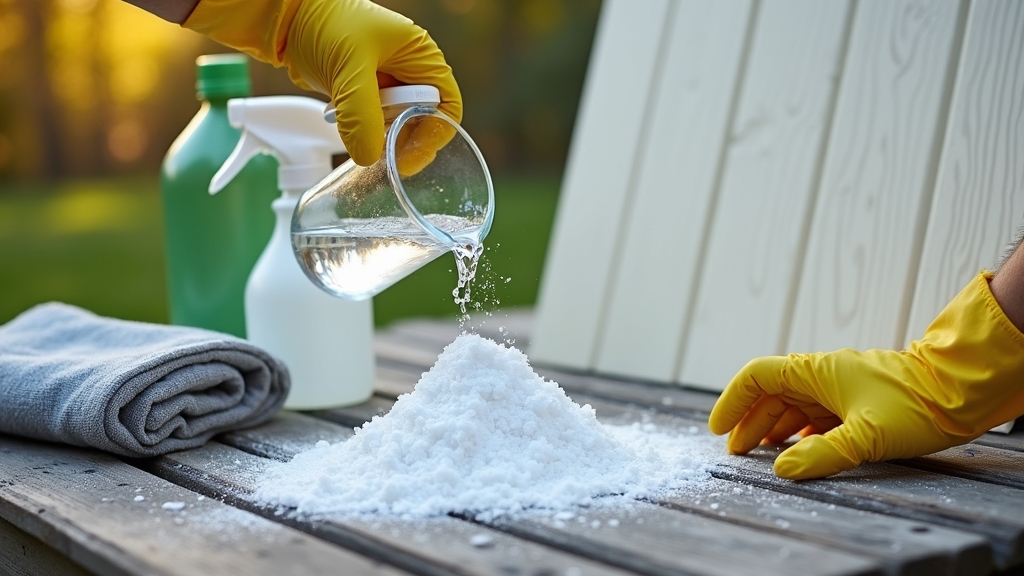
Before you start removing stains from your vinyl siding, you’ll need to prepare an oxalic acid solution by mixing 8 ounces of oxalic acid powder into 1 gallon of warm or hot water.
Warm water helps dissolve the crystals quickly and thoroughly, so stir continuously as you mix. Avoid cold water since it slows dissolution. Oxalic acid is an effective chemical for dissolving rust stains, making it ideal for this purpose. Always ensure proper moisture control to maximize the effectiveness of your cleaning solution.
Using warm water speeds up crystal dissolution; avoid cold water which slows the process. Stir continuously while mixing.
If you premix and store the solution, stir it well before use to re-suspend any settled crystals. Before applying, clean the siding with soap and hot water to remove dirt and grime, ensuring better contact with the acid.
Always wear gloves and eye protection, and work in a well-ventilated area to avoid inhaling dust. Avoid applying the solution on wet siding or right after rain for best results.
Applying Pine-Based Cleaners to Break Down Residue
When you apply pine-based cleaners to your vinyl siding, you tap into natural oils that effectively break down organic residues and stubborn stains without harsh abrasives. Regular cleaning maintains home’s aesthetic appeal and prevents buildup that can damage the siding.
Start by mixing the cleaner with warm water following the manufacturer’s ratio. Strain the solution to avoid particles that could scratch the siding, as using soft-bristled brushes helps prevent surface damage.
Use a soft-bristled brush or microfiber cloth to apply the cleaner, working from bottom to top to prevent streaks. Let the solution sit to allow the pine oils to penetrate grime before rinsing with low-pressure water. Remember to wear gloves and protect surrounding plants.
Choose a commercial pine cleaner rated for vinyl, like Pine-Sol or Mr. Clean Fresh Pine. Test the solution on a hidden area to check for discoloration. Apply evenly and allow dwell time for stain breakdown. Rinse gently to avoid vinyl damage.
Using Oil-Based Cleaners for Stubborn Stains
When you’re dealing with stubborn stains on vinyl siding, picking the right oil-based cleaner is super important. You’ll want to find products that are specifically designed to break down grease and tar, but make sure they won’t harm your siding.
Once you’ve got your cleaner, it’s time to get to work! Start by wetting the area you’re going to clean. Then, apply the cleaner using a soft brush or a low-pressure sprayer. It’s important to test on small areas first to prevent damage or uneven coloring.
Using a pH-neutral formula helps protect the siding’s finish during cleaning. It’s a good idea to tackle small sections at a time so the cleaner doesn’t dry out too quickly.
After letting the cleaner sit for a little while, if you notice some tough spots, give them a gentle scrub. And don’t forget to rinse everything thoroughly afterward to avoid any residue buildup.
Choosing Effective Oil Cleaners
Although stubborn oil stains on vinyl siding can be challenging to remove, choosing the right oil-based cleaner makes a significant difference.
You want a product that penetrates deeply without damaging your siding. Consider cleaners with non-corrosive, biodegradable formulas to protect both your vinyl and the environment.
DeckGeneral® Vinyl Siding Cleaner 50162, for example, is biodegradable and nonflammable, making it a safe choice for your home and garden. Proper maintenance and care of vinyl siding also helps prevent stains from setting in and reduces the need for harsh cleaning agents.
Concentrated degreasers are excellent but must be properly diluted, typically 10:1 with water, to avoid harm. For older, tougher stains, automotive-grade or specialty cleaners work best.
Here’s what to look for:
- Formulas with surfactants and emulsifiers to break down oil molecules
- Thickened solutions for better surface retention and stain penetration
- Non-petroleum solvent bases for safer cleaning without harsh residues
- Biodegradable ingredients that prevent environmental toxicity
Application Techniques
Selecting the right oil-based cleaner sets the stage for effective stain removal. However, how you apply it makes all the difference in protecting your vinyl siding.
Start by rinsing the siding gently with a garden hose to remove loose dirt. This step helps reduce dirt and stains that can interfere with cleaning.
Use a garden sprayer to evenly coat the stained areas with the cleaner, allowing it to sit for 5–10 minutes without drying. Proper application techniques ensure even coverage and prevent damage to the siding.
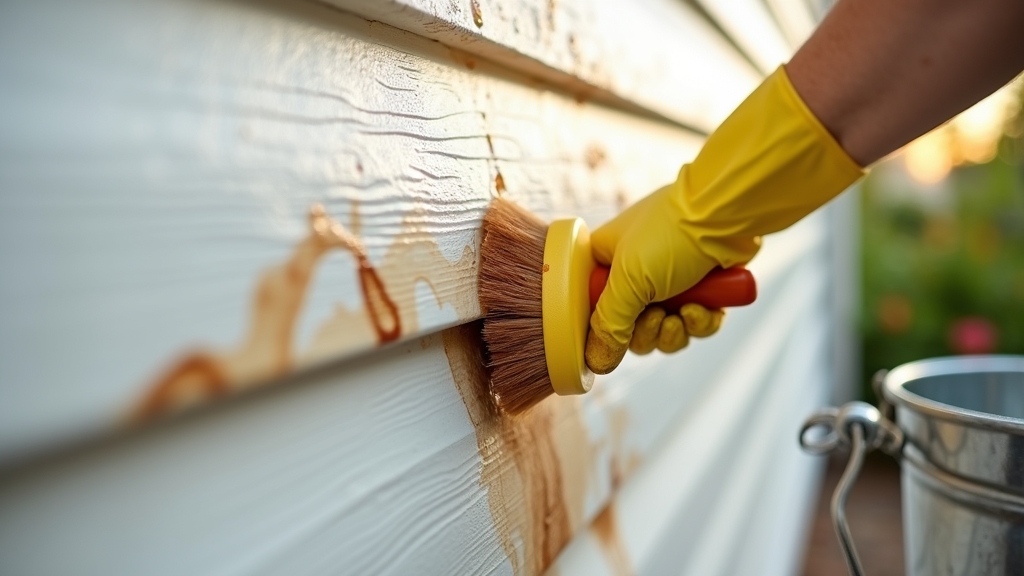
For textured siding, apply the cleaner with a soft-bristle brush to avoid pushing stains deeper. If stains are stubborn, reapply and gently agitate with the brush. Never use abrasive tools.
Always dilute the cleaner per instructions, wear gloves, and protect nearby plants. After treatment, rinse thoroughly with low-pressure water to remove all residues and prevent damage.
Drying and Scrubbing
Since oil-based cleaners need time to work, you should let them sit on the vinyl siding for 5 to 10 minutes before scrubbing. Avoid exceeding 10 minutes to prevent streaks or residue.
Use a soft-bristle nylon brush and scrub gently in circular or vertical motions to lift stains without damaging the surface. Once scrubbed, rinse immediately to prevent discoloration or film formation.
The product is designed to be safe, fast, and effective, so it cleans deeply without harming the siding. It is important to rinse thoroughly after scrubbing to avoid any sticky residue forming on the surface.
After rinsing, let the siding air dry naturally; don’t use heat sources. Keep these tips in mind:
- Use firm but gentle scrubbing in small sections
- Avoid abrasive pads or steel wool
- Rinse thoroughly right after scrubbing
- Inspect for streaks and re-clean if needed
Specialized Products for Paint and Wood Stain Removal
When you tackle paint or wood stains on vinyl siding, basic cleaners often won’t cut it. You’ll need specialized products designed for these tougher marks.
Commercial-grade removers like Krud Kutter and Zep House and Siding Pressure Wash target stubborn paint or wood stains effectively. For mildew combined with paint stains, Simple Green OxySolve offers a peroxide-based solution that lifts grime without bleach.
These products are rated highly for ease of use and effectiveness, making them reliable choices for homeowners. Regularly inspecting your siding and promptly treating stains can prevent long-term damage and buildup.
| Product | Best Use |
|---|---|
| Krud Kutter | Paint and oil stain removal |
| Zep House and Siding Pressure Wash | Heavy-duty cleaning with power washer |
| Simple Green OxySolve | Mixed stains including mildew |
Apply these cleaners with a soft brush, allow dwell time, then rinse thoroughly for best results. Using a waterproof sealant around vulnerable areas can help protect your siding from moisture-related stains in the future.
Protective Measures and Safety Precautions
Although cleaning vinyl siding can improve your home’s appearance, you must prioritize protective measures and safety precautions to avoid injury and damage.
Start by wearing gloves, safety goggles, and a face mask to shield yourself from harsh chemicals and splashes. Use long sleeves and closed-toe shoes for extra protection. Proper attire helps minimize the risk of skin irritation and exposure to harmful substances.
When handling equipment like pressure washers, set them to low pressure with a wide-angle nozzle and keep a safe distance to prevent siding damage. It is also important to rinse thoroughly to remove all cleaner residues, which helps prevent potential harm to the siding and surrounding plants.
Also, protect your environment by covering plants and avoiding windy days to reduce chemical drift. Maintaining safe working conditions ensures both personal safety and environmental protection.
Key precautions to follow:
- Wear appropriate protective gear (gloves, goggles, mask, and clothing).
- Use pressure washers carefully at low settings.
- Cover nearby plants and avoid windy conditions.
- Store and handle chemicals safely and ventilate well.
Post-Treatment Rinsing and Maintenance Tips
After applying your chosen cleaning solution, rinse your vinyl siding thoroughly to remove all residues and prevent streaks or spots.
Rinse vinyl siding thoroughly after cleaning to remove residues and prevent streaks or spots.
Use a garden hose with steady, even spray from top to bottom. Keep the surface wet to avoid soap drying and spotting, as thorough rinsing helps prevent streak-free finishes.
If power washing, hold the nozzle at eye level and maintain a 2-3 feet distance. Use low to moderate pressure with a 40-degree tip. Avoid directing water upward behind siding to prevent moisture buildup.
Once rinsed, inspect for missed stains, residue, or trapped water. It is also important to protect landscaping by covering nearby plants and outdoor furniture before cleaning begins.
Schedule rinsing at least once or twice a year, avoiding direct sunlight or extreme heat to prevent streaks. Regular gentle rinsing after dust or pollen exposure helps maintain your siding’s clean appearance and prolongs its life.
Addressing Difficult and Persistent Stain Challenges
When you’re dealing with those pesky fingerprint stains, it’s best to go for gentle cleaners. You definitely want to avoid damaging the vinyl. But if those stubborn smudges just won’t budge, you might need to reach for some specialized products to get the job done.
Proper identification of the stain type is important to choose the right cleaning method before starting. Using the correct cleaning agents ensures material compatibility and prevents long-term damage.
Now, let’s talk about paint splatters. They can really cling on tight to the surface, right? So, it’s often necessary to use paint removers that are specifically designed for vinyl siding. Trust me, it makes a difference!
And what about those vent runoff stains? They usually come with pesky mineral deposits or discoloration. For those, targeted treatments like oxalic acid solutions can really help break down that buildup effectively. Just a little bit of effort can go a long way!
Tackling Fingerprint Stains
Since fingerprint stains on vinyl siding often result from oils and dirt transferred during installation, you need to act quickly to prevent these marks from darkening and becoming permanent.
Fresh fingerprints contain greasy residue that oxidizes and worsens with moisture and UV exposure. To tackle them effectively:
- Inspect vinyl regularly to catch fingerprints early before they set in.
- Use magic erasers or soft cloths with mild soap and water for gentle cleaning.
- Avoid harsh scrubbing to protect the vinyl’s surface coating.
- For stubborn stains, apply specialized removers like Motsenbocker’s Lift-Off briefly, then rinse with glass cleaner.
Prompt, gentle cleaning prevents fingerprints from embedding deeply, maintaining your siding’s appearance and avoiding costly restoration later. Additionally, pressure washing can be an effective method for cleaning larger areas of vinyl siding when stains are widespread.
Removing Paint Splatters
Although paint splatters on vinyl siding can be frustrating, identifying the type and age of the paint is your first step toward effective removal.
For fresh water-based paint, mix laundry detergent with warm water, apply, scrub gently with a soft brush, and rinse. It is important to blot wet paint immediately with a clean cloth to avoid spreading the stain.
For stubborn oil-based paint, carefully scrape with a plastic tool or try vinyl-safe paint removers. WD-40 and white vinegar also help loosen dried acrylic paint. Always test cleaners on a small spot, avoid harsh scrubbing, and rinse thoroughly to protect your siding’s finish.
Handling Vent Runoff Stains
Vent runoff stains can stubbornly cling to your vinyl siding, especially because moisture and airborne particles continuously deposit grime in specific areas.
These stains often resist routine cleaning and can worsen over time, fueled by grease, dirt, or mold. To tackle them effectively, follow these practical tips:
- Use a mild solution of 70% water and 30% white vinegar for light stains and mildew.
- Apply a baking soda paste to lift greasy residues before scrubbing gently with a soft brush.
- Treat mold or mildew with diluted hydrogen peroxide (1:1 with water) for a chemical-free option.
- For persistent stains, consider commercial siding cleaners like Motsenbocker’s Lift-Off but apply carefully to avoid color fading.
Always rinse thoroughly and avoid high-pressure washing that might force water behind siding, risking damage. It is best to start with low pressure and maintain a safe distance when using a pressure washer to prevent harming the vinyl siding.
Frequently Asked Questions
Can Vinyl Siding Be Stained Permanently by Sun Exposure?
Yes, sun exposure can permanently stain vinyl siding by causing fading and discoloration. UV rays break down the pigments and resins, leading to chalking, fading, and color loss that cleaning won’t fix.
Once your siding’s color fades unevenly or develops brittle patches, the damage is irreversible. To prevent this, you should use UV-resistant coatings, shade your siding, and choose high-quality, UV-stable materials to protect it from permanent sun damage.
How Often Should Vinyl Siding Be Cleaned to Prevent Stains?
Think of cleaning your vinyl siding like tuning a musical instrument. You want to do it regularly to keep everything in harmony. You should clean it at least once a year, especially if you live in humid or polluted areas.
For homes near roads or shaded spots prone to mildew, twice a year is better. Regular rinsing and prompt cleaning after storms will help prevent stains and keep your siding looking fresh and lasting longer.
Are There Natural Alternatives to Chemical Stain Removers?
Yes, you can use natural alternatives like diluted white vinegar, borax mixed with hot water and vinegar, and oxygen bleach to remove stains from vinyl siding. These options are effective against mold, mildew, and algae while being safer for plants and pets.
Just apply, let the solution sit, scrub gently, and rinse. These natural methods reduce harsh chemical exposure and environmental impact.
Will Pressure Washing Damage Vinyl Siding?
Sure, blast your vinyl siding with a pressure washer set to tornado-force and watch it magically turn into a patchwork of cracks and waterlogged walls! But seriously, don’t do that. High-pressure washing can force water behind panels, cause cracks, and erode protective layers.
Instead, use soft washing with low pressure and gentle detergents to clean safely without risking costly damage. Keep your siding intact and your home dry; pressure’s not always the answer.
How to Protect Vinyl Siding During Home Painting Projects?
To protect vinyl siding during painting, start by applying painter’s tape around windows, shutters, and fixtures to avoid paint contact.
Use plastic sheeting to cover nearby plants and drop cloths for ground protection. Remove screens and shutters to reduce masking time.
Choose moderate weather with low humidity for painting, and confirm the siding is clean and dry beforehand. This careful prep prevents damage and ensures a smooth, clean finish.
Transform Your Vinyl Siding into a Weather-Ready Shield
Removing stains from your vinyl siding is like restoring a clear window to your home’s soul. By carefully preparing solutions, applying the right cleaners, and protecting yourself throughout, you peel away layers of grime that cloud its shine.
Remember, patience and proper care are your tools. Rinse thoroughly and maintain regularly to keep your siding bright. With these steps, you’ll not only clean but renew the protective shield that stands against time and weather.