Best Way to Cut PVC Pipe: Clean, and Perfect Every Time
You should begin by measuring and marking your PVC pipe precisely, using a tape measure and a straight line method to guarantee an accurate cut.
Secure the pipe firmly with clamps or a vise to prevent movement. Choose the appropriate cutting tool like a ratcheting cutter for smaller pipes or a power saw for larger jobs.
Cut slowly and steadily, then deburr and chamfer the edges for smooth, leak-proof joints. Proper preparation and technique set you up for success.
Explore further for detailed steps and safety tips.
Key Takeaways
- Measure and mark the pipe accurately using a pencil and a paper wrap guide for a straight, perpendicular cut line.
- Secure the pipe firmly with a vise or clamp, avoiding pressure on the cut mark to prevent damage or slipping.
- Use a rotating or ratcheting pipe cutter for small diameters, or an electric miter saw with a fine-tooth blade for larger pipes.
- Cut slowly and steadily, reducing speed near the end, and rotate the pipe evenly to ensure a clean, straight cut.
- Deburr and chamfer the cut edge with a deburring tool or utility knife to remove burrs and ease fitting insertion.
Measure and Mark PVC Pipe Accurately

Before you cut your PVC pipe, you need to measure and mark it accurately to guarantee a precise fit.
Start by using a reliable tape measure, extending it along the pipe’s surface, and noting the exact length needed.
Mark the cut location clearly with a pencil, assuring the line is perpendicular to the pipe’s axis.
For added precision, wrap a piece of paper around the pipe and draw a straight line on it, then transfer this line to the pipe. This guarantees your cut is uniform around the circumference.
Avoid guessing or freehand marking, as it leads to misalignment.
Accurate measuring and marking set the foundation for a clean cut, preventing waste and assuring your pipes fit tightly in the assembly.
Using proper measurement tools and techniques ensures precision and repeatability in your cuts.
Secure Your PVC Pipe Before Cutting
Before you start cutting your PVC pipe, make sure to secure it tightly. You can use a vise or some good clamps for this. It’s super important to keep the pipe stable, so it doesn’t move around while you’re working.
Position the pipe in a way that feels solid and won’t shift when you apply pressure with your saw or cutter. Trust me, proper clamping really helps ensure a straight and accurate cut.
Plus, it reduces the chances of any accidents happening. Safety first, right? For added precision and control, consider the importance of ergonomics and stability when handling cutting tools.
Proper Clamping Techniques
Clamp your PVC pipe firmly to prevent any movement during cutting, as even slight shifts can result in uneven or unsafe cuts.
Use a sturdy clamp or C-clamp attached to a stable workbench to hold the pipe securely. Position the clamp so it exerts pressure just outside the marked cutting area to avoid damaging the pipe where you intend to cut.
Make sure the pipe is level and doesn’t rotate under pressure. If your clamp has rubber or padded jaws, use them to prevent marring the pipe surface.
Avoid relying solely on hand pressure or loose fixtures, as these increase the risk of the pipe slipping. Proper clamping stabilizes the pipe, allowing accurate, controlled cuts with your saw or pipe cutter.
Using tools with soft rubber grips can further reduce hand fatigue during prolonged cutting tasks.
Using Vises Securely
Secure your PVC pipe firmly in a vise to eliminate any movement while cutting, ensuring precise and safe results.
A securely clamped pipe prevents shifting that can cause uneven cuts or accidents.
When setting up your vise:
- Position the pipe so the cut mark is fully exposed and accessible.
- Tighten the vise jaw just enough to hold the pipe without crushing it.
- Use soft jaws or wrap the pipe with a cloth to protect the surface from damage.
- Check stability by gently rocking the pipe; it shouldn’t move at all.
Following these steps guarantees your pipe remains stable, letting you focus on accurate sawing without risk.
Proper vise use is critical before employing any cutting method. Using appropriate personal protective equipment such as gloves and goggles is also important to ensure safety during cutting.
Preventing Pipe Movement
Prevent pipe movement by firmly anchoring your PVC in place before cutting to guarantee clean, accurate results. Use a vise, clamp, miter box, or even duct tape to secure the pipe. This prevents slipping, which can cause uneven cuts or injury.
Confirm the pipe is stable by applying gentle pressure before starting your cut. For optimal precision, consider using tools with features like laser guides to ensure alignment while cutting.
| Securing Method | Best For | Notes |
|---|---|---|
| Vise | Workbench setups | Provides strong, stable hold |
| Clamp | Portable use | Quick adjustment, versatile |
| Miter Box | Precise angled cuts | Guides saw for straight lines |
| Duct Tape | Temporary holds | Useful for light-duty securing |
Choose the method that fits your workspace and pipe size to maintain safety and precision.
Selecting the Right Tools for Cutting PVC Pipe
Choosing the right tool for cutting PVC pipe depends largely on the pipe’s diameter and the scope of your project.
For smaller diameters like 1/2” or 3/4”, a rotating pipe cutter offers clean, precise cuts with minimal effort.
For pipes up to 1-1/2”, ratcheting cutters provide accuracy but are better suited for fewer cuts to avoid fatigue.
If you’re working on multiple or larger pipes, power tools like an electric miter saw deliver speed and uniformity, provided you use a fine-tooth blade.
Scissor-style cutters are handy for quick, small-diameter cuts but limit their use on thicker pipes.
For more versatility and efficiency on larger projects, cordless reciprocating saws with variable speed triggers and tool-free blade changes can provide precise cuts with less user fatigue.
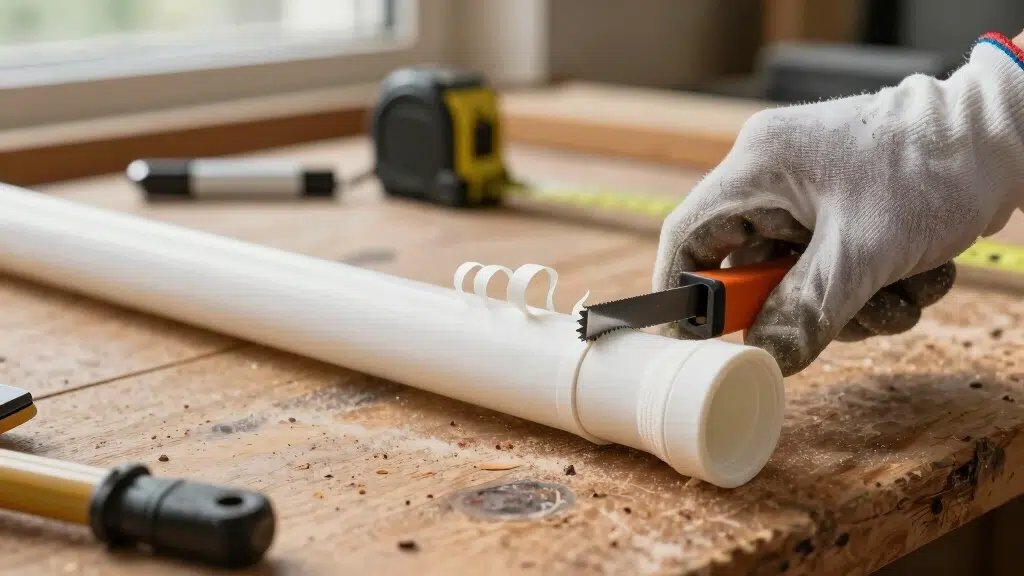
Using Hand Saws: Tips and Techniques
When working without power tools, a hacksaw remains the most versatile hand saw for cutting PVC pipe. This is especially true for pipes too large or awkward for pipe cutters.
First, secure the pipe firmly using a vise, clamp, or duct tape to avoid shifting. Mark your cut clearly with a tape measure and pencil.
Saw slowly with steady back-and-forth strokes, reducing speed near the end for a clean cut. After cutting, deburr the edges to remove sharp shavings.
For projects requiring greater precision and efficiency, a corded drill with variable speed control can be invaluable for preparing the pipe before cutting.
| Step | Action | Tip |
|---|---|---|
| Secure Pipe | Use vise or clamp | Prevents pipe movement |
| Mark Cut | Measure and draw line | Guarantees straight cuts |
| Saw & Deburr | Slow, steady strokes | Clean finish, safe edges |
Using Pipe Cutters: Types and Best Uses
Select the right pipe cutter based on your PVC pipe’s diameter and project size for efficient, clean cuts. For small-diameter pipes like 1/2” or 3/4”, rotating pipe cutters provide precise results with minimal effort.
If you’re working with pipes up to 1-1/2” diameter, ratcheting cutters offer better control through repeated squeezing and releasing. Scissor-type cutters work well for pipes 1 inch or less but aren’t suited for frequent use due to hand fatigue.
- Rotating cutters: best for small diameters, quick cuts
- Ratcheting cutters: ideal for medium diameters, accurate control
- Scissor-type cutters: effective for small pipes, limited use
- Avoid overuse to prevent hand strain and damage to brittle pipes
Use pipe cutters for small projects requiring clean, uniform cuts without power tools. Always ensure proper protective gear when handling tools to safeguard against injury and maintain safety.
Power Tools for Fast, Accurate PVC Pipe Cuts
Speed up your PVC pipe cutting projects by using power tools designed for accuracy and efficiency. An electric miter saw with a fine-tooth blade delivers fast, clean cuts on large quantities.
Secure the pipe tightly to the saw base before cutting. For tight spaces, an oscillating multi-tool offers excellent maneuverability. A Sawzall or circular saw with a fine-tooth blade also works well but requires careful alignment and slow blade lowering.
| Power Tool | Best Use |
|---|---|
| Electric Miter Saw | Large volume, high accuracy |
| Oscillating Multi-tool | Tight spaces, detailed cuts |
| Sawzall | Versatile, medium volume |
| Circular Saw | Straight cuts, moderate volume |
| Fine-Tooth Blade | Essential for clean edges |
Corded electric planers equipped with features like dual dust extraction can also help prepare PVC pipe edges smoothly and efficiently.
Choose the right tool based on volume and workspace constraints for best results.
Tips for Clean, Straight PVC Pipe Cuts
Although cutting PVC pipe may seem straightforward, achieving clean, straight cuts requires careful preparation and technique. You’ll want to minimize errors that cause uneven edges or pipe deformation. Follow these practical tips to improve your cuts:
Cutting PVC pipe cleanly demands careful technique to avoid uneven edges and deformation.
- Secure the pipe firmly using a vise, clamp, or duct tape to prevent movement during cutting.
- Use a marker or wrap paper as a guide to draw a precise, straight cut line around the pipe’s circumference.
- If using a hand saw, cut slowly and steadily, reducing speed near the end to avoid jagged edges.
- Rotate the pipe cutter evenly around the pipe or use ratcheting action carefully for consistent pressure and alignment.
These methods guarantee a clean, straight cut, reducing the risk of fitting issues later. Proper preparation and maintenance, such as regular cleaning and avoiding harsh chemicals, help preserve the integrity of the pipe and any applied finishes like waterproof protection.
Deburring and Chamfering PVC Pipe Ends
Once you’ve made a clean, straight cut on your PVC pipe, the next step involves removing any rough edges left behind.
Use a deburring tool or a utility knife to carefully scrape away burrs from the cut end. This prevents sharp edges that can interfere with fittings or cause injuries.
After deburring, chamfer the pipe end by beveling the edge at a slight angle, typically 15 to 30 degrees. This facilitates easier insertion into connectors and guarantees a tight seal.
For larger diameters, a conical twist tool works best to create a consistent chamfer. Always check that the end is smooth and even before proceeding.
Proper deburring and chamfering improve joint integrity and prevent leaks in your PVC piping system.
Stay Safe When Cutting PVC Pipe
When you’re cutting PVC pipe, the first thing you want to do is secure it firmly. You can use a vise, clamp, or even some duct tape to hold it in place.
This step is super important because any movement while you’re cutting can lead to injury or an uneven cut.
Now, let’s talk about your cutting tools. Make sure to operate them according to their instructions.
This is especially true for power tools like miter saws. Following the guidelines helps you maintain control and avoid any accidents.
Remember, a proper setup and careful handling go a long way.
With these tips, you’ll be able to make safe and accurate cuts every time!
Proper Pipe Securing
Secure the PVC pipe firmly before starting any cut to guarantee both accuracy and safety. Unstable pipe movement leads to uneven cuts and potential injuries. Use solid methods to hold the pipe in place and prevent shifting during cutting.
Follow these steps to secure your PVC pipe properly:
- Use a vise or clamp to hold the pipe tightly against your work surface.
- Employ a miter box for guided, straight cuts, especially with a hacksaw.
- For smaller pipes, wrap duct tape around the pipe and secure it to a stable base.
- Avoid holding the pipe by hand while cutting to prevent slips and accidents.
Proper securing improves cut precision and reduces the risk of damage or personal injury.
Safe Tool Operation
Operate cutting tools with full attention to safety protocols to prevent accidents and guarantee clean, accurate cuts.
Always secure the PVC pipe firmly using a vise, clamp, or duct tape to prevent shifting during cutting.
When using hand saws like a hacksaw, maintain a slow, steady stroke, especially near the end, to avoid jagged edges.
For power tools such as an electric miter saw, make certain the pipe is clamped tightly and align the blade precisely with your cut mark before lowering it slowly.
Use fine-tooth blades to minimize roughness and swaging.
Always wear safety glasses and gloves to protect against flying debris and sharp shavings.
Avoid holding the pipe by hand during saw cuts to prevent injury.
Deburr edges post-cut for smooth, safe fittings and peak flow.
Preparing and Dry Fitting PVC Pipes Before Cementing
Before applying primer and cement, carefully measure, mark, and cut the PVC pipes to guarantee accurate fitment.
Once cut, deburr and chamfer the pipe ends to ensure smooth insertion and prevent damage to the fitting seals.
Next, perform a dry fit by assembling the pipes and fittings without adhesive to verify alignment and length.
Follow these steps:
- Secure the pipe firmly to avoid movement during cutting.
- Use a deburring tool or file to remove sharp edges and burrs.
- Chamfer the pipe end with a conical twist tool for larger diameters.
- Assemble and adjust the parts dry to confirm a precise, gap-free fit.
This preparation ensures strong, leak-proof joints when the cement is applied.
Frequently Asked Questions
How Do Temperature Changes Affect PVC Pipe Cutting and Fitting?
Temperature changes affect PVC pipe cutting and fitting by causing expansion or contraction, which can alter pipe dimensions.
When you cut or fit PVC in cold conditions, the pipe contracts slightly, potentially leading to tighter joints.
In heat, it expands, which can cause loose fittings if assembled at high temperatures.
You should measure and cut pipes at moderate temperatures and allow them to acclimate before final fitting to guarantee proper alignment and secure seals.
Can PVC Pipe Be Recycled After Cutting and Use?
You might think PVC pipe turns into treasure once cut, but yes, you can recycle it!
Just don’t toss scraps in the trash; find a local recycling center accepting PVC.
Cut pieces must be clean, free of adhesives or contaminants.
Recycling PVC reduces plastic waste and environmental impact.
Always prep your scraps by removing dirt and fittings.
Then drop them off responsibly to keep your workspace and planet tidy and efficient.
What Are Common Mistakes to Avoid When Gluing PVC Joints?
Common mistakes to avoid when gluing PVC joints include not cleaning or deburring the pipe ends, which leads to poor adhesion.
Don’t skip dry fitting before applying cement; it helps guarantee proper alignment.
Avoid applying too much or too little primer and cement; use just enough for a secure bond.
Also, hold the joint firmly for at least 30 seconds to prevent movement and leaks.
Finally, avoid working in dusty or wet conditions for best results.
How Long Should PVC Primer and Cement Cure Before Pressure Testing?
You should let PVC primer and cement cure for at least 15 minutes before handling.
Wait 2 hours before light pressure testing, and a full 24 hours before subjecting the joint to full pressure.
These timeframes guarantee the adhesive bonds properly, preventing leaks or joint failure.
Always check the product instructions, as curing times may vary by temperature and pipe diameter.
Patience guarantees a strong, reliable seal in your PVC system.
Are There Eco-Friendly Alternatives to Traditional PVC Pipe?
Yes, you can choose eco-friendly alternatives like HDPE (high-density polyethylene) pipes or PEX (cross-linked polyethylene), which are recyclable and have lower environmental impact.
You might also consider bioplastic pipes made from plant-based materials, though availability varies.
These options reduce reliance on traditional PVC, which involves harmful chemicals during production.
Always evaluate durability and chemical resistance to make certain the alternative suits your project’s needs effectively.
Clean Cuts, Strong Connections: The Final Step to Perfect PVC Installation
Now, imagine a smooth, clean cut on your PVC pipe, ready to fit perfectly without gaps or rough edges. By measuring carefully, securing your pipe, and choosing the right tool, whether a sharp hand saw or a precise pipe cutter, you’ll achieve professional results every time.
Don’t forget to deburr and chamfer the edges for a seamless fit. With safety gear on and patience in hand, you’re set for a flawless, durable installation.