How to Bend Hardwood: Kerf Cuts and Laminated Strips
To bend hardwood, first soak it in water to raise moisture content to about 12-16%. Then steam it for roughly an hour per inch of thickness to soften lignin. Use a sturdy form matching your desired curve and clamp the steamed wood securely to avoid cracking.
For thicker or tighter bends, consider kerf cutting or laminated strips. Keep temperatures near 200°F and act quickly after steaming for best results. Following proper preparation and techniques guarantees successful shaping. Explore further for detailed methods and safety tips.
Key Takeaways
- Soak hardwood in water for several hours and steam at 212°F about one hour per inch of thickness to soften lignin for bending.
- Use a sturdy form or mold made from plywood or MDF shaped precisely to the desired curve radius for accurate bending.
- Clamp steamed wood securely and evenly to the form immediately after steaming to maintain the shape and prevent cracking.
- For thicker wood, consider kerf cuts or laminating thin plies glued and clamped on a form to achieve tighter bends without damage.
- Monitor and maintain wood moisture content between 12-16% with a moisture meter to ensure flexibility and prevent brittleness during bending.
Understanding Hardwood Properties for Bending
When you work with hardwood bending, understanding the wood’s anatomical structure is essential because its mechanical properties vary considerably with grain direction. Wood is anisotropic; its strength and stiffness differ along longitudinal, radial, and tangential axes.
Bending stresses induce compression on the concave side and tension on the convex, with a neutral axis at mid-thickness. Fiber orientation is critical since tensile strength parallel to grain is 10-20 times greater than perpendicular.
The wood’s microstructure is prone to rolling shear, a common failure mode under bending loads. Defects like knots, juvenile wood, and cracks create stress concentrations, weakening bending performance.
You should select mature, defect-free wood, preferably cut longitudinally to maximize fiber continuity and tensile strength, ensuring ideal bending resistance and durability. Surface roughness and density also significantly influence bending quality and long-term stability.
Additionally, selecting wood with a stable engineered hardwood structure can improve resistance to warping and enhance bending performance.
Preparing Wood for Bending: Moisture and Thickness Considerations
You need to guarantee your hardwood has the right moisture content, typically near or above the fiber saturation point, to keep lignin pliable during bending. Because wood exhibits viscoelasticity, it can flex under stress yet retain some deformation, which is crucial to consider during bending.
Thickness plays a critical role too; thicker pieces require longer steaming to allow heat and moisture to penetrate fully and prevent uneven stresses. Balancing moisture and thickness is essential for achieving uniform flexibility and avoiding cracks or breaks.
Additionally, ensuring a stable subfloor during installation is important to maintain the wood’s structural integrity after bending.
Moisture Content Importance
Although moisture content critically influences wood’s strength and flexibility, managing it precisely is essential for successful bending. You should aim for a moisture range between 12% and 16% to balance lignin plasticity and structural integrity.
Too dry—below 12%—and the wood becomes brittle, reducing bend success. Too wet—above 15%—and strength decreases, though flexibility rises. Use a pinless moisture meter for accurate readings, especially with hardwoods.
Steam bending requires heating wood near 200°F to soften lignin, which is easier at higher moisture levels. Maintaining moisture throughout bending reduces fiber stretch and breakage risk.
Monitor moisture content with a moisture meter to ensure proper drying results and avoid issues like shrinking or joint failures during the drying phase. monitoring moisture After bending, keep wood supported on forms until it dries to about 6% moisture to fix the shape.
Consistent moisture control prevents cracking, springback, and fiber tear during the entire bending process. Regularly vacuum or dust mop the surrounding work area can help maintain optimal conditions for wood handling and prevent contamination that could affect adhesion or finish.
Thickness Impact on Flexibility
How does thickness influence the flexibility of hardwood during bending? Thickness directly affects the bending radius and force needed. A common guideline is a 1:5 thickness-to-radius ratio; for example, a 1-inch thick board bends to a 5-inch radius.
Thinner boards allow tighter bends with less force, while thicker boards markedly increase toughness but reduce flexibility. This happens because resistance to bending grows nonlinearly with thickness, demanding greater force due to increased elastic and viscoplastic resistance.
Moreover, the area moment of inertia increases with thickness, significantly impacting bending stiffness. Using improper methods or adhesives during preparation can also risk surface damage to the wood.
Additionally, the lever arm effect means bending thick stock requires more force as the unbent portion shortens. Make sure consistent thickness along the wood to avoid uneven stress and cracking. For thick hardwoods, mechanical leverage is often necessary, whereas thin stock can bend more easily by hand.
Steam Bending Hardwood: Equipment and Process
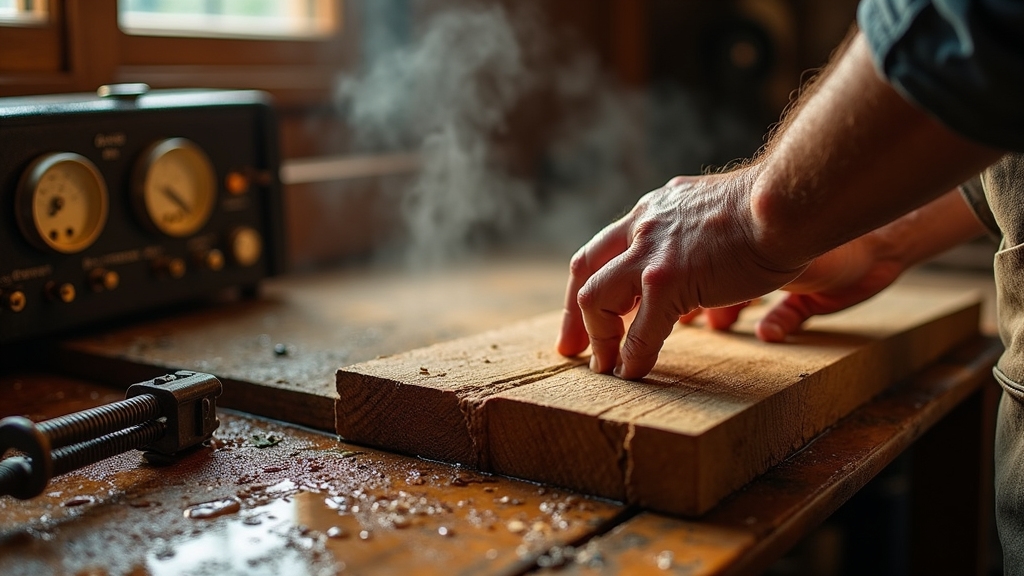
To steam bend hardwood effectively, you’ll need a well-constructed steam box, ideally made from exterior-grade plywood, and a reliable steam generator to maintain consistent temperature. Steaming makes the lignin in the wood more fluid, increasing its pliability.
Prepare your hardwood by selecting species with good bending properties and ensuring it has adequate moisture content before steaming. Maintaining proper moisture is crucial, as it parallels the importance of regular floor moisture maintenance to preserve wood integrity..
Essential Steam Box Setup
When setting up your steam box for bending hardwood, you need to guarantee it accommodates the wood pieces comfortably while maintaining consistent steam circulation and temperature.
Construct the box from plywood, wood, or PVC, ensuring an interior clearance of about an inch around the wood for even steam distribution. The size of the box should be slightly larger than the wood length and diameter to allow proper bending without restriction, as size depends on wood.
Incorporate rigid fiberglass insulation to retain heat and minimize steam loss. Seal the box with gaskets or aluminum flashing, and install hinges and latches on the open end for easy access. Cut a steam inlet hole on the closed end and connect it to your steam source using a heat-resistant hose.
Include racks or wires inside to support wood uniformly. Finally, add a drainage system to remove condensation and monitor temperature closely to maintain ideal steaming conditions throughout the process.
Preparing Hardwood for Steaming
Although selecting the right hardwood species is critical, preparing the wood properly before steaming is equally important for successful bending.
Use only air-dried hardwood with straight grain for maximum flexibility; avoid kiln-dried wood because hardened lignin reduces pliability. It is also beneficial to soak wood in water for several hours prior to steaming to increase moisture content and flexibility.
Measure thickness accurately—steam the wood approximately one hour per inch of thickness to soften lignin bonds effectively. It is essential to control moisture levels carefully since excessive water use can lead to damage in wood fibers during bending.
Before steaming, ensure the wood is free from excessive moisture. If soaked, allow a drying period to prevent immediate expansion. Preheat your steam chamber to 212°F (100°C) before inserting the wood to maintain consistent steam flow.
Position the boards on racks inside the chamber to allow even exposure. Proper preparation ensures the wood fibers soften uniformly, maximizing plasticity and reducing breakage risk during bending.
Bending and Clamping Techniques
Since hardwood lignin softens only within a narrow temperature range, maintaining consistent steam conditions around 200–230°F (93–110°C) is vital for effective bending.
After steaming, you must transfer the wood quickly to prevent lignin from hardening, then clamp it securely to hold the desired shape as it cools and dries. Proper maintenance and testing of equipment ensures consistent steam conditions and safety during the process.
Use strap clamps for even pressure and position them near bending points to reduce stress concentrations. Follow these key steps for bending and clamping:
- Remove wood promptly from the steam box and place it onto the mold or former shaped to your curve. The wood should be steamed for about 1-2 hours depending on thickness to ensure optimal flexibility.
- Apply clamps gradually and evenly, monitoring tension to avoid cracks or splits.
- Use adjustable stops on the mold to prevent overbending and maintain consistent curves.
Using Kerf Cutting to Shape Hardwood Curves
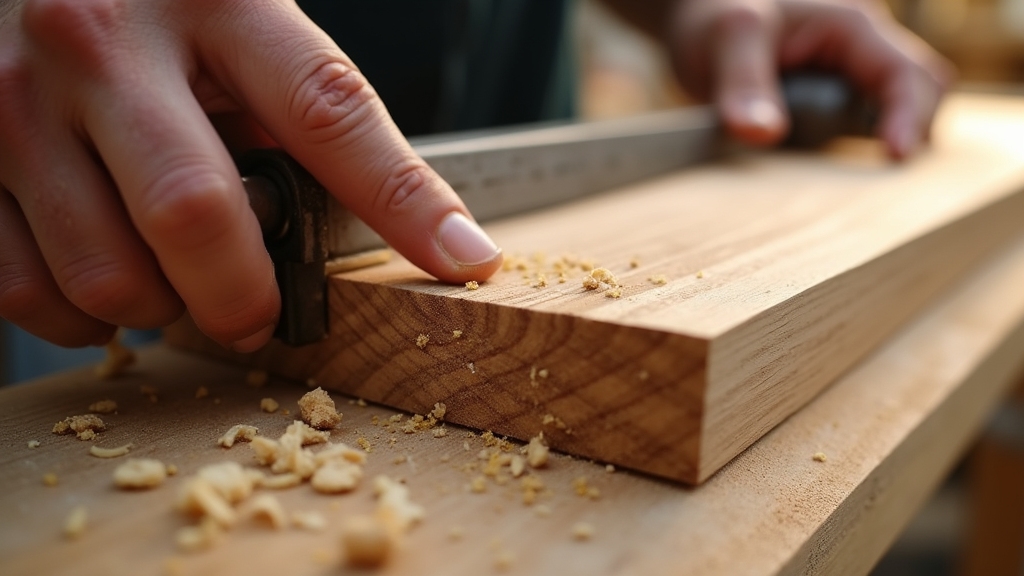
If you want to bend hardwood without relying on moisture or complex equipment, kerf cutting offers a practical solution by strategically removing material to increase flexibility.
You make a series of closely spaced, partial cuts perpendicular to the bend direction, typically reaching three-quarters of the wood’s thickness but leaving about 1/16 inch uncut to maintain integrity.
This method preserves the wood’s structural integrity while enhancing flexibility, similar to how engineered hardwood maintains durability through its core layers. The spacing between kerfs controls the bend radius—closer for tighter curves, wider for gentler bends.
Use a table saw, handsaw, or router with a guide to ensure uniform kerfs. This technique can be performed with a manual saw, not necessarily a table saw, making it accessible for many woodworkers using simple tools. manual saw
After cutting, clean out dust to prevent cracking during bending. The uncut wood acts as a living hinge, allowing the hardwood to flex without breaking.
Testing on scrap wood helps optimize depth and spacing for your specific species and thickness. Consider the wood species and finish type because different hardwoods vary in moisture resistance and durability, affecting bending performance.
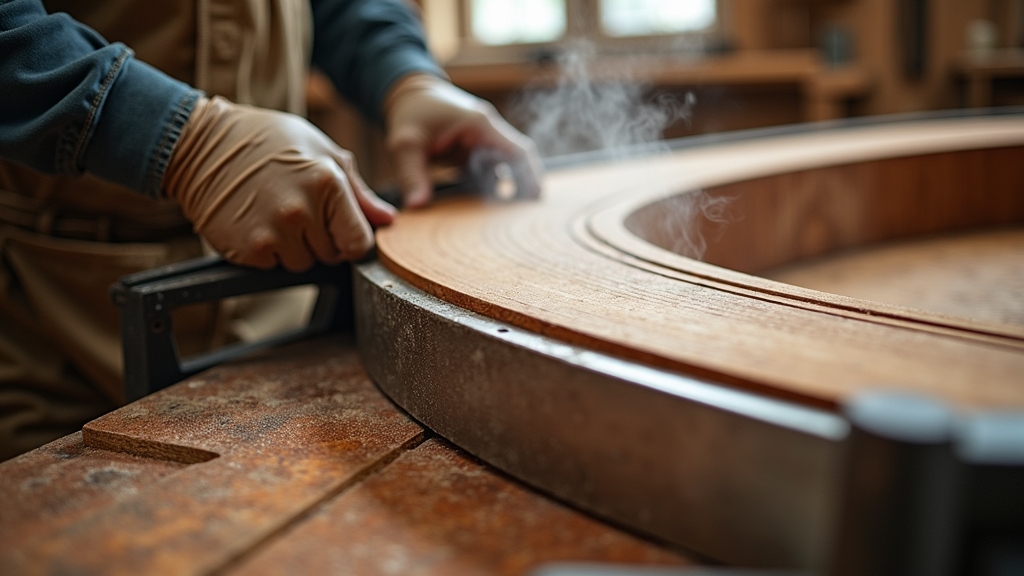
Glued Laminated Wood Techniques for Hardwood Bending
When you need to create strong, precise curves in hardwood, glued laminated wood techniques offer a reliable method by bonding thin, uniform plies over a shaped form. Start by resawing hardwood into 1/16 to 1/8 inch plies, ensuring consistent thickness with a drum sander.
Create strong, precise hardwood curves by laminating thin, uniform plies over a shaped form.
Use MDF forms for shaping, protecting them with tape and wax to prevent glue adhesion. Apply Gorilla polyurethane glue for longer open time and clamp evenly to avoid gaps. Follow these key steps for effective lamination:
- Align plies with grain orientation preserved for strength and aesthetics.
- Clamp uniformly using multiple clamps to maintain pressure across the curve.
- Clean excess glue promptly to ensure a smooth finish and maintain tool safety.
This technique offers strong, consistent curves ideal for complex hardwood designs. For finishing and maintenance, consider using non-toxic hardwood floor cleaners to protect and preserve the wood’s natural beauty while maintaining a safe environment.
Water Soaking and Heat Methods for Hardwood Flexibility
Water soaking and heat application play essential roles in increasing hardwood flexibility for bending. Soak your hardwood in hot water for 1 to 3 hours, adjusting time based on species and thickness, until fully saturated. Hot water accelerates lignin softening, enhancing pliability.
Selecting wood with grain aligned parallel to the sides improves bending results and reduces cracking. Inspect the wood and soaking container regularly to avoid excess moisture accumulation that could lead to damage.
For precise bends, apply heat locally using heated metal or steam chambers, maintaining moisture to prevent burning or brittleness. Steam bending demands careful pressure control for safety and uniform softening. Using protective gear and controlled equipment helps manage heat and moisture safely during the process.
Adding surfactants can improve water penetration. After bending, secure the wood in a jig and let it dry slowly for at least 24 hours to set the shape and avoid cracking or spring-back. Re-immersion in hot water post-bend can correct distortions. Monitoring environmental conditions like humidity or temperature during drying can improve final results.
Laminating Thin Strips to Create Curved Hardwood Components
Although solid hardwood has natural limits on flexibility, laminating thin strips lets you create tight, stable curves that would otherwise be impossible. You start by cutting uniform strips less than 1/8″ thick, ensuring smooth, glue-ready surfaces. Dampening figured woods with a spray bottle before planing helps reduce chatter and chipout, improving surface quality.
Next, you apply glue evenly, using a roller helps, and stack the strips on a rigid form shaped to your desired curve. Clamping firmly until the glue cures locks the shape permanently. Apply glue evenly with a roller, stack strips on a form, and clamp firmly until cured to lock the curve.
To achieve ideal results:
- Select hardwoods like maple or oak for strength and appearance.
- Use extended open-time glue for complex assemblies.
- Employ clamping cauls and straps to distribute pressure evenly around curves.
Designing and Building Bending Forms and Clamps
Laminating thin strips into curved hardwood components depends heavily on the quality and accuracy of the bending forms and clamps you use. Design your forms from rigid, stable materials like plywood or MDF, shaped precisely to the required radius, often using templates or CAD drawings.
Incorporate alignment aids and consider adjustable or segmented forms for compound curves. Using cold press lamination techniques, these forms must withstand prolonged pressure during curing.
Build clamps to apply even pressure along the bend; space them every few inches to prevent spring-back. Use light initial clamping, then tighten after glue sets to maintain consistent pressure. For steam bending, clamps or straps must hold wood until fully cooled.
Protect form surfaces with wax or tape to resist glue and moisture, ensuring smooth release. Regularly clean glue buildup and check forms for warping to maintain accuracy over repeated use.
Safety Tips and Best Practices When Bending Hardwood
When bending hardwood, you must prioritize safety to prevent injuries and guarantee a successful outcome. Begin by identifying hazards like steam burns, flying chips, and dust inhalation.
Always wear heat-resistant gloves, safety goggles, and a dust mask, while avoiding loose clothing that could catch on tools. Keep your workspace organized and inspect all equipment, including the steam box and clamps, before use.
Selecting the appropriate wood based on project needs and bending technique ensures better results and reduces the risk of breakage. Follow these best practices:
- Handle steam safely: keep your face clear of openings, drill drain holes in the steam box, and monitor temperature between 180–212°F to avoid overheating or pressure buildup.
- Secure the wood firmly with well-placed clamps, using waste blocks to prevent damage and checking for cracks after clamping.
- Leave wood clamped until fully cooled and dried to prevent spring-back, then inspect for defects before use.
Frequently Asked Questions
Which Hardwood Species Bend Best for Musical Instrument Making?
You’ll find maple and ash bend best for musical instruments due to their strength, flexibility, and straight grain patterns. Maple is especially favored for bodies and necks because it bends without cracking when steamed properly.
While rosewood and ebony are denser and harder to bend, they’re used for fretboards due to durability. Mahogany bends reasonably well and offers rich tones, making it practical for acoustic instruments. Always consider moisture content and conditioning for ideal bending results.
How Does Wood Grain Direction Affect the Final Bend Strength?
Imagine bending wood with grain perfectly parallel versus at a 15° angle; you’ll notice a huge strength difference. When grain aligns with the bend, you get maximum tensile and bending strength. Deviate the grain just 15° and tensile strength drops over 50%, weakening the piece.
Misaligned grain leads to early fractures and reduced elasticity. So, always keep grain direction straight along the bend to guarantee durability and structural integrity.
Can Hardwood Bending Techniques Be Used for Outdoor Furniture?
Yes, you can use hardwood bending techniques for outdoor furniture, but you must select rot-resistant species like white oak or teak. Steam bending works well with these woods if you dry them thoroughly and apply waterproof finishes.
Laminating requires waterproof adhesives, and kerfing needs sealed cuts to avoid moisture issues. Combine methods and use protective treatments to maintain strength and shape despite outdoor exposure and weather cycles.
What Adhesives Work Best for Glued Laminated Hardwood Under Moisture Exposure?
You’ll want to use polyurethane or epoxy adhesives for glued laminated hardwood exposed to moisture. Polyurethane adhesives offer strong, moisture-resistant bonds and tolerate temperature changes, making them ideal for tight laminations.
Epoxy adhesives provide exceptional durability and chemical resistance, bonding wood to various materials while filling gaps. For added protection, consider combining urethane-based adhesives like Bostik’s BEST® with moisture vapor barriers to prevent subfloor moisture damage and ensure long-lasting performance.
How to Repair Splits or Cracks Formed During Hardwood Bending?
To repair splits during bending, first apply polyurethane wood glue deep into the crack, then clamp firmly for at least 24 hours to guarantee a strong bond. For small surface splits, cyanoacrylate works well but lacks structural strength.
Fill wider cracks with compatible wood filler, then sand and finish. After curing, reinforce the area with glued splints if needed, and avoid stressing the repair until fully dry to prevent reopening.
From Straight to Stunning: Creating Elegant Curves with Confidence
Bending hardwood takes patience, proper preparation, and the right techniques. Whether you choose steam bending, kerf cutting, or laminating thin strips, understanding wood’s moisture and thickness is essential for success.
Don’t overlook designing sturdy forms and clamps to maintain precise curves. So, why settle for straight when you can master these methods and create strong, elegant curves? With careful practice and safety in mind, you’ll confidently shape hardwood to fit your project’s needs.