How to Refinish Hardwood Without Sanding: 3 Effective Methods to Try
Refinishing hardwood floors can bring new life into your home and give your flooring a fresh, revitalized appearance. While traditional refinishing methods often involve sanding, alternative approaches allow you to achieve impressive results without the need for sanding.
The water-based polyurethane revitalizer gloss, chemical stripping and tung oil application, and lacquer finish are popular and effective methods for refinishing hardwood floors without the need for sanding.
Applying these methods involves cleaning and preparing the hardwood floor. Then, depending on the chosen method, you may apply a water-based polyurethane revitalizer gloss, use chemical stripping and apply Tung Oil, or opt for a lacquer finish. Allow the solution to dry completely before adding more coats.
We’ll explore the step-by-step instructions for each of these methods to guide you through the refinishing process.
How to Refinish Hardwood Without Sanding: Different Methods with Step-by-Step Procedures
Refinishing your hardwood without sanding is possible through some effective methods. Here are three methods to use:
- Method 1: Use a Water-Based Polyurethane Revitalizer Gloss
- Step 1: Collect the Necessary Materials and Supplies
- Step 2: Thoroughly Clean the Floor
- Step 3: Apply the Revitalizer
- Step 4: Let It Dry
- Method 2: Use Chemical Stripping and Tung Oil Application
- Step 1: Clean the Floor
- Step 2: Apply the Chemical Stripper
- Step 3: Remove the Stripper
- Step 4: Apply the Tung Oil
- Method 3: Use Lacquer Finish without Sanding
- Step 1: Clean the Floor
- Step 2: Apply Lacquer
- Step 3: Apply Another Coat
Method 1: Use a Water-Based Polyurethane Revitalizer Gloss
To refinish your hardwood floors without sanding, you’ll need to follow a few key steps.
Step 1: Collect the Necessary Materials and Supplies
Gather all the materials and supplies you’ll need for refinishing your hardwood floors without sanding.
Start by gathering hardwood floor cleaner, a mop, a broom, a vacuum, cleaning wipes, and scouring pads. These will help you prepare the floor surface before applying the revitalizer.
You will also need painter’s tape to protect walls and baseboards from any accidental spills.
For applying the revitalizer, you can either use a mop or a paint roller. A paint tray will suffice if you don’t have a garbage bag and shoe box. Ensure a plastic garbage bag is handy for disposing of any used cleaning materials.
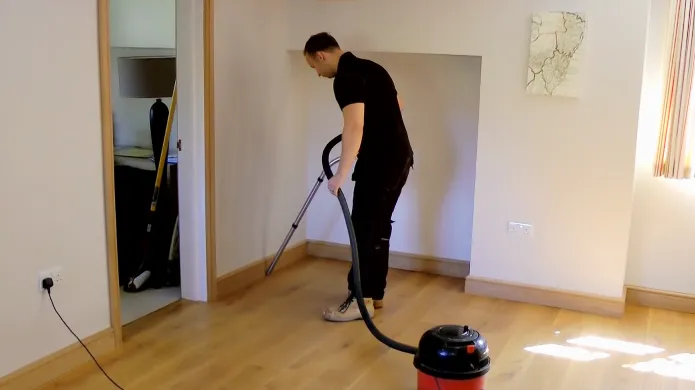
Step 2: Thoroughly Clean the Floor
Start by removing all furniture, doors, and rugs from the room. Then, sweep the floor to get rid of any loose dirt.
This is a crucial step in refinishing hardwood floors without sanding. By clearing the area and eliminating any potential obstacles, you can ensure a thorough and effective cleaning process.
Once the room is empty, grab a hardwood floor cleaner and a mop to tackle those stubborn stains and grime. Work in small sections, applying the cleaner and using the mop to scrub away any dirt or residue.
Take your time and be thorough, paying extra attention to high-traffic areas or spots that require extra attention. Ensure the floors are completely clean and dry before moving on to the next step.
Step 3: Apply the Revitalizer
You will now need to apply the revitalizer. To apply the revitalizer, follow these steps:
- Shake the revitalizer bottle well to mix the solution thoroughly. This will ensure that the revitalizer is ready for application and provides consistent results.
- Pour the revitalizer into a paint tray or use a mop with a built-in applicator. This will make applying the revitalizer evenly across the entire floor easier.
- Start applying the revitalizer from one side of the room to the other, working in an even layer. Be sure to get into corners and up against the edges of the walls, ensuring no inconsistent spots or puddles are left behind.
Step 4: Let It Dry
Once the revitalizer has been applied, wait for it to dry completely before removing the painter’s tape and allowing foot traffic or placing the furniture back in the room.
After applying the revitalizer, be patient and give it time to work its magic. Most products dry within 45 minutes, but to achieve optimal results, waiting a full 24 hours is recommended.
Method 2: Use Chemical Stripping and Tung Oil Application
Chemical stripping and the use of tung oil are also effective methods. Follow these four key steps to refinish your hardwood floors using chemical stripping and tung oil application.
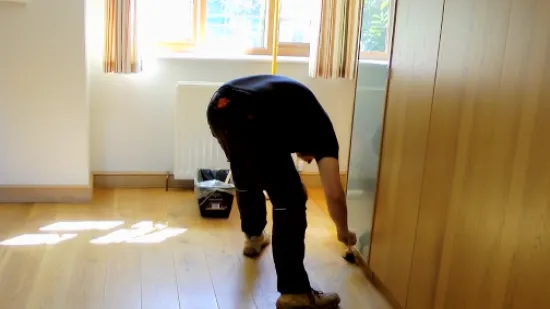
Step 1: Clean the Floor
You need to remove all furniture and objects from the room. Sweep the floor to remove any loose dirt and debris. This is essential in preparing the hardwood floor for refinishing without sanding.
A thorough sweep ensures no dirt or debris interferes with the refinishing process. Next, grab a damp mop and a mild wood floor cleaner. Make sure to choose a cleaner that is specifically designed for hardwood floors to avoid any potential damage.
Begin mopping the floor, covering every inch of the surface. This will help remove any grime or stains accumulated over time. Once you’ve finished cleaning, allow the floor to dry completely before moving on to the next step.
Step 2: Apply the Chemical Stripper
It’s time to use the chemical stripper. To start the process, identify the areas where the varnish has worn off or there are stains, spills, or pet stains on your hardwood floor. Take a close look at your floor and carefully examine every inch to pinpoint the affected areas.
Once you have identified these spots, you should select a suitable chemical stripper for your specific hardwood floor type.
Look for a stripper that is recommended for your particular type of wood to ensure the best results. When you have the stripper in hand, follow the manufacturer’s instructions to apply it to the affected areas. Make sure to wear protective gloves and work in a well-ventilated area.
Allow the stripper to sit for the recommended time, as this will soften the old finish and prepare it for removal. Remember that the stripper usually needs some time to work, so be patient.
Step 3: Remove the Stripper
Once the recommended time has passed, gently use a scraper or soft cloth to remove the softened old finish. Remember to be cautious and avoid damaging the wood surface while removing the stripper.
Start by scraping off the loosened finish, working toward the wood grain. Apply light pressure and take your time to ensure thorough removal. If there are stubborn areas, you may need to repeat the stripping process to achieve the desired result.
After removing the old finish, wipe down the wood surface with a clean cloth to remove any residue or leftover stripper. This step is crucial to prepare the wood for the next refinishing stage. Take care not to rush this process and pay attention to detail to achieve a smooth and even finish.
Step 4: Apply the Tung Oil
It is now necessary to apply tung oil. When applying the tung oil, follow the instructions on the product for the best results.
To apply the tung oil, use a lint-free cloth or brush to apply thin and even coats. You need to allow each coat to dry completely before applying the next one. This will ensure a smooth and flawless finish.
Depending on the desired finish, you may need to apply multiple coats of Tung Oil. This will enhance the durability of your hardwood floors and give them a stunning appearance.
Method 3: Use Lacquer Finish without Sanding

The lacquer finish method works well too for refinishing hardwood without sanding. Here are the steps to follow:
Step 1: Clean the Floor
Clear the room of all furniture and objects to make a workspace. Once the room is cleared, it’s time to thoroughly sweep the floor, ensuring that you remove any loose dirt and debris. This initial cleaning step is essential as it sets the foundation for a successful refinishing process.
After sweeping, it’s time to use a mild wood floor cleaner and a damp mop to clean the hardwood floor. Make sure to be thorough and meticulous, ensuring that you remove any grime or stains from the floor surface.
Once the cleaning is complete, allow the floor to dry completely before proceeding to the next step. This ensures that the floor is ready for the refinishing process.
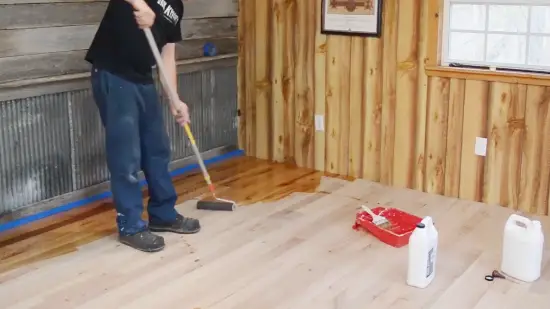
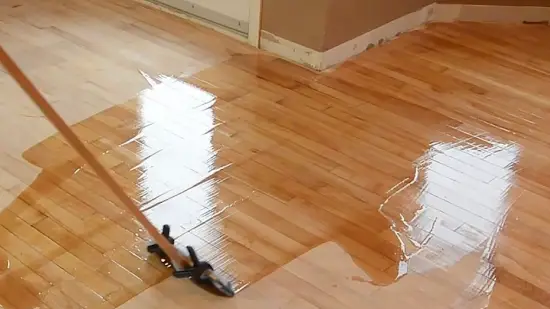
Step 2: Apply Lacquer
Once the floor is clean and dry, you can apply the lacquer using a brush, roller, or sprayer to ensure complete and even coverage.
Make sure to choose a high-quality floor-grade lacquer that is compatible with your hardwood floor type. Read and follow the manufacturer’s instructions for application and safety guidelines.
Start by pouring the lacquer into a paint tray or container. Dip the brush, roller, or sprayer into the lacquer, making sure to remove any excess.
Begin applying the lacquer in a smooth and even motion, working in small sections at a time. Be careful not to leave any streaks or puddles.
Allow the first coat to dry according to the manufacturer’s instructions before applying additional coats if necessary. Remember to clean your tools thoroughly after each use.
Step 3: Apply Another Coat
After the first coat of lacquer has dried completely, you can apply additional coats as the manufacturer recommends to achieve the desired level of durability and gloss.
Mistakes to Avoid When Refinishing Hardwood Floors Without Sanding
When refinishing hardwood floors without sanding, you need to avoid some common mistakes. Here are some:
1. Not Identifying the Type of Hardwood Floors
If you don’t identify the type of hardwood floors, you may choose the wrong refinishing approach. This can lead to unsatisfactory results and potential damage to your floors.
To avoid this, take the time to determine the type of flooring you have before starting the refinishing process.
Here are some reasons why this step is crucial:
- Different types of hardwood floors require specific refinishing methods and products. By identifying the type of flooring, you can ensure that you choose the appropriate approach.
- Factory-applied finishes, wax coatings, and other treatments may require different refinishing techniques. Knowing what you’re working with will help you avoid costly mistakes.
- Identifying the type of hardwood floors also allows you to understand their durability and susceptibility to wear and tear. This knowledge can help you make informed decisions about the refinishing process and the level of care needed.
2. Overlooking Surface Preparation
Properly preparing the surface is essential for achieving a successful and long-lasting hardwood floor refinishing project.
Neglecting to clean the floor thoroughly can have negative consequences, such as the new finish not adhering well to the surface, resulting in peeling or unevenness.
3. Ignoring Floors with Wax or Residue
Ignoring wax or residue on your hardwood floor can lead to a poor bond and uneven finish. Before refinishing, removing any wax or residue from the surface is crucial.
4. Skipping a Test Spot
It may be tempting to skip this step, but it is vital to assess the compatibility of the revitalizer or finish with your hardwood floor. Applying the product to a small inconspicuous area first ensures that it dries and adheres correctly, preventing any potential damage or undesirable results.
This simple test spot will give you valuable information about how the product will interact with your floor, allowing you to make any necessary adjustments before applying it to the entire surface.
5. Using Too Much Revitalizer or Finish
Using excessive amounts of revitalizer or finish can result in a cloudy or hazy appearance on the floor, longer drying times, and difficulty removing the excess product. You have to remember that less is often more when applying these products.
Applying too much can lead to a build-up that affects the floor’s appearance and makes it harder for the product to dry properly. This can result in an uneven finish and a longer waiting time before the floor can be walked on.
6. Neglecting to Apply Multiple Coats
To ensure optimal protection and longevity for your hardwood floor, it’s important to apply multiple coats of revitalizer or finish as the product manufacturer recommends. Neglecting to do so can result in a less durable and less aesthetically pleasing finish. Here are some reasons why applying multiple coats is essential:
- Increased durability: Each coat adds an extra layer of protection to your floor, making it more resistant to scratches, stains, and wear.
- Enhanced appearance: Multiple coats help to even out the color and sheen of your floor, giving it a more polished and professional look.
- Better coverage: Applying multiple coats ensures that every nook and cranny of your floor is adequately covered, leaving no vulnerable spots.
- Longer lifespan: The more coats you apply, the longer your finish will last, saving you time and money in the long run.
7. Rushing Drying Time
Allowing the revitalizer or finish ample time to dry between coats is crucial for preventing smudging and ensuring a perfect finish. Rushing the drying process can lead to undesirable results, such as smearing or ruining the finish.
To achieve the best outcome when refinishing hardwood without sanding, you have to be patient and give each coat enough time to dry completely. This typically takes anywhere from a few hours to a full day, depending on the specific product used and environmental conditions.
How often do hardwood floors need to be refinished?
Hardwood floors need to be refinished every 7-10 years, as recommended by flooring professionals. Refinishing also becomes necessary when floors display visible blemishes such as scratches, and dents.
Hardwood floors can be refinished around 4-6 times over their lifetime, ensuring that the recommended refinishing intervals are more than adequate.
What are the different types of hardwood floor finishes?
There are several different types of hardwood floor finishes available, including water-based polyurethane, oil-based polyurethane, moisture-cured polyurethane, wax, shellac, and varnish.
Each finish comes with its unique strengths and weaknesses, making it essential to choose the right one based on your flooring needs.
Water-based polyurethane is fast-drying, eco-friendly, and ideal for high-traffic areas. Oil-based polyurethane is highly durable and resistant to wear and tear.
Flooring with moisture problems may benefit from moisture-cured polyurethane, known for its exceptional moisture resistance.
Wax provides a soft, low-gloss sheen, while shellac offers a natural, glossy appearance.
Varnish comes in various sheen levels, making it a versatile option for those looking to find a durable, customizable finish.
Embrace the Charm of Refinished Hardwood Floors
Now you know that refinishing hardwood floors without sanding is indeed possible with the right methods. By following the step-by-step procedures for each method, you can achieve impressive results and breathe new life into your home.
Remember to clean the floors thoroughly and choose the appropriate finish for your specific hardwood type.
Avoid common mistakes such as skipping a test spot, using too much product, and rushing the drying time. With proper care and maintenance, your newly refinished hardwood floors will continue to shine for a long time.